There are six steps you'll need to follow to set this up. Each one is explained in detail below.
1.Allow remote connections to the computer you want to access.
2.Make sure Remote Desktop is able to communicate through your firewall.
3.Find the IP address of the computer on your home network that you want to connect to.
4.Open your router's configuration screen and forward TCP port 3389 to the destination computer's IP address.
5.Find your router's public IP address so that Remote Desktop can find it on the Internet.
6.Open Remote Desktop Connection and connect.
Allow remote connections to the computer you want to access
To access one computer from another computer, you first need to allow remote connections on the computer you want to access, which must be running one of the following versions of Windows:
Windows XP Professional edition
Windows Vista Business, Ultimate, or Enterprise edition
Windows 7 Professional, Ultimate, or Enterprise edition
On the computer you want to access, follow these steps:
Open System by clicking the Start button , right-clicking Computer, and then clicking Properties.
In the left pane, click Remote settings. If you're prompted for an administrator password or confirmation, type the password or provide confirmation.
Under Remote Desktop, select one of the options to allow connections. For more information about these options, see What types of Remote Desktop connections should I allow?
Click Select Users.
In the Remote Desktop Users dialog box, click Add.
In the Select Users or Groups dialog box, do one or more of the following:
To specify the search location, click Locations.
To specify the types of objects (user names) that you want to search for, click Object Types.
In the Enter the object names to select box, type the user name that you want to search for, and then click Check Names. If the user name isn't found, click Advanced to run an advanced search.
When you find the correct name, click OK.
The name will be displayed in the list of users in the Remote Desktop Users dialog box.
Click OK, and then click OK again.
Make sure Remote Desktop is able to communicate through your firewall
If you're using Windows Firewall, follow these steps:
Click the Start button , click Control Panel, type "firewall" in the search box, and then click Windows Firewall.
Click Allow a program or feature through Windows Firewall.
Under Allowed programs and features, scroll down to Remote Desktop and make sure its check box is selected.
Under Home/Work (Private), make sure the check box next to Remote Desktop is selected.
If you're using a non-Microsoft firewall, refer to the instructions that came with your firewall.
Find the IP address of the computer on your home network
Next, determine the IP address of the destination computer—the one you want to connect to.
Click the Start button , click Control Panel, type "network" in the search box, and then click Network and Sharing Center.
Next to Connections, click the link for your current network connection (either Wireless Network Connection or Local Area Connection).
Click Details.
Write down the IP address listed next to IPv4 Address. You'll need this address when you turn on port forwarding.
Forward TCP port 3389 to the destination computer's IP address
To allow remote connections from outside of your home network, you need to set up your router to forward remote access requests to the computer that you want to connect to.
On any home network computer that's connected to the Internet, open a web browser and type the internal IP address of your router. This address will usually be 192.168.1.1, 192.168.0.1, or 192.168.2.1. Refer to the instructions that came with your router if you need more information about accessing the router's configuration screen.
Type the router administrator user name and password.
In the router's configuration screen, look for a place to turn on port forwarding (also called port mapping).
Forward TCP port 3389, the default port for Remote Desktop Connection, to the IP address of the home computer you want to access from outside the network.
To access more than one of your home computers from outside the network, you can forward an additional TCP port to each additional computer. For example, you can forward TCP port 3390 to a second computer, TCP port 3391 to a third computer, and so on. Then change the listening port, the port that Remote Desktop listens to for incoming network traffic that matches that port, on each computer to match the number you assigned. When you use Remote Desktop Connection to connect to these computers, type the IP address of the router, followed by a colon and the port number (for example, 208.147.66.254:3390).
Changing the listening port is also helpful as a security measure, since a malicious user might first try port 3389, the default for Remote Desktop Connection. By changing the listening port, the malicious user has to guess which port you've chosen. For information about changing the listening port, see How to change the listening port for Remote Desktop on the Microsoft website.
Find your router's public IP address
While you're still at home and connected to your home network, open a web browser and search for "find IP address" to find a service that will report your router's public IP address. Unfortunately, some computers are given a different IP address each time they connect to the Internet. An Internet service provider (ISP) can use a few IP addresses to serve many customers that way, but it means that your computer's address on the Internet is always changing.
To get around the problem of a frequently changing IP address, try a DNS dynamic update service, which allows you to assign a URL to your router that you can use instead of an IP address. The URL stays the same no matter how often the IP address changes. To find a service, search for "DNS dynamic update" on the Internet.
Open Remote Desktop Connection and connect
Now you're ready to actually make the connection. Follow these steps on a computer outside of your network:
Click the Start button , type "remote" in the search box, and then click Remote Desktop Connection.
Type the router's public IP address in the Computer field (followed by a colon and the new port number, if you've changed the listening port; for example, 208.147.66.254:3390).
Log on to the remote computer as you normally do.
Saturday, September 25, 2010
Friday, September 24, 2010
Windows Aero Glass Transparent Effect in Vista
Aero is actually acronym (or backronym) for Authentic, Energetic, Reflective and Open.
Windows Aero requires high system specifications in order to work, with the minimum requirements of at least 1 GHz 32-bit (x86) or 64-bit (x64) processor, 1 GB (gigabyte) of system memory and a DirectX 9 compatible graphics accelerator processor card with a minimum of 128 MB of Video RAM, installed with Windows Display Driver Model (WDDM) driver.
Sometimes Windows Vista may wrongly detect that the graphics adapters are not sufficiently powerful for Vista to automatically enable Aero. In this case, user can manually enable Aero.
1.Click on the Start button and then click on “Control Panel”.
2. Click on “Appearance and Personalization”.
3.Click on “Personalization”.
4.Click “Window Color and Appearance”.
Tick Enable Transparency
5.Click on “Open classic appearance properties for more color options”.
6.Select the Windows Aero color scheme.
Aero requires 32-bit graphics settings and higher resolution as possible.
However, Aero can still be enable with the following workaround trick, as long as it has Aero supported graphic cards, if it’s still not available after the above 6 steps.
Go to Start button, then click on Run.
Run “regedit”.
Browse and navigate to HKEY_CURRENT_USER\Software\Microsoft\Windows\DWM\ registry branch.
On the following registry subkeys, edit and change the default value:
Composition to 1
CompositionPolicy to 2
Exit registry editor.
Go to Start and click on Run again.
Execute and run the following commands one by one:
net stop uxsms
net start uxsms
Thursday, September 23, 2010
Enable/Disable (hidden) Administrator account in Windows 7 & Vista
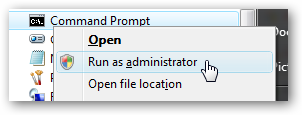
Go to All Programs >> Accessories. Right click Command Prompt and then select Run As Administrator .

To enable at the command prompt type
C:\....\.....> net user administrator /active:yes
To disable at the command prompt type:
C:\...\...> net user administrator /active:no
Sunday, September 19, 2010
Excel Mail Merge - Rounding decimal points and percentage issue
1. With the mail merge main document open, press Alt + F9 to view the field codes.
2. The field code will look something like {MERGEFIELD “fieldname” }
ex. {Mergefield MyNumber \# #.###.00 }3. Once you have added your field switch, press Alt + F9 to display the fields instead of codes.
Percentage format in merge from excel
based from the above instructions:
change #2 with this format:
if Word is showing something like '0.1234' with or without the percentage sign and you need it to show '12%', try selecting your merge-field,
pressing Ctrl-F9 to embed it in another field and code the lot
as: '{={MERGEFIELD ExcelData}*100 \# 0%} for 12%,
or
Tuesday, September 14, 2010
Vista - The User Profile Service failed the logon.
Fix the User Account Profile:
1. Start Menu >> Start Search, type regedit and press Enter
2. goto HKey_Local_Machine\Software\MicroSoft\Windows NT\CurrentVersion\ProfileList
3. At the left pane, look for S-1-5...... folder (SID) that has .bak at the end
4. At the right pane, look for ProfileImagePath to verify the user account with error.

5. The folder with no .bak, rename and put .bk at the end

6. For the folder with .bak, remove the .bak at the end

7. In the right pane of the one without .bak now, right click on RefCount and click on Modify.


8. In the right pane of the one without .bak now, right click on State and click onModify

9. Close Regedit
10. Restart
Tuesday, September 7, 2010
SATA AHCI mode is not supported by Windows XP
- Disable the AHCI mode of SATA drives in BIOS.
- download the SATA driver and extract
- go to device manager and select Sata ATA driver
- update the driver
- select install from a specific location and browse the location of the driver
- select the correct chipset
- reboot
- goto BIOS, enable the AHCI mode of SATA
- Start the Windows
- select yes to reboot when windows has new device
Subscribe to:
Posts (Atom)