There are two different tools within Group Policy. To force the user to use a particular font we will add some new registry preferences. To disable Stationery (outlook XP-2007) and Themes (outlook 2007) we can create custom administrative templates.
Preferences:


Preferences:
Group Policy Preferences were introduced into Windows Server 2008 & Vista to allow easier modification of settings that are categorised as preferences, e.g. a users printers or drive mappings. It’s a great way to move away from logon scripts that includes all the functionality of the GPMC. See the image on the left for an example of what can be set through GPPs. For more info on the difference between GP Policy vs. Preference vs. GP preferences check out this TechNet blog. One of the great features is Registry Settings and this is how we achieve our goal.
This will work on Windows XP, 2003, Vista, 2008 and Seven providing the client has the Group Policy Preference Client Side Extensions (CSE) and XMLite installed. Each version of windows can download the CSEs, for its particular OS, through Windows Update or WSUS. XMLite is installed with Internet Explorer 7 or Windows XP SP3 and is included in Vista and above. There are links to all of these files in this Microsoft knowledge base article

Forcing Outlook’s font
To find the correct registry values we need to choose a test machine and configure it how we want.
- On a test pc with Office 2007 installed
- Open Outlook
- Go to Tools > Options > Mail Format > Stationery & Fonts…
- Use the Font… button to specify the size, type and colour of the font for new messages
- Use the other Font buttons to specify replies and plain text settings if necessary
- Click OK and close outlook
- Open the Group Policy Management Console (Part of RSAT – download here)
- Create a new Policy and open it in the Group Policy Editor
- Go to User Configuration > Preferences > Windows Settings > Registry
- You can either create the new keys yourself or use the much easier Registry Wizard
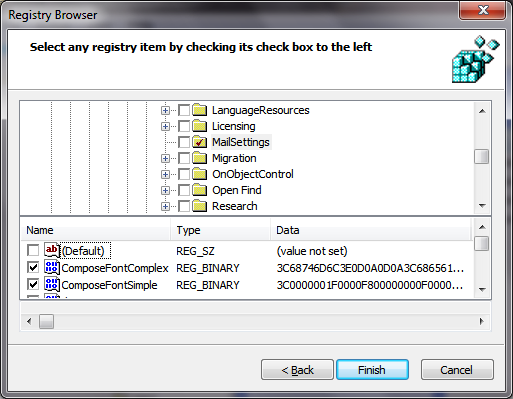
- Right Click “Registry” and choose New > Registry Wizard (see Fig. 2)
- Choose Local Computer
- Navigte to the following Key
- HKEY_CURRENT_USERSoftwareMicrosoftOffice12.0CommonMailSettings
- Tick the values ComposeFontComplex,ComposeFontSimple, ReplyFontComplex andReplyFontSimple (see Fig. 3)
- Click Finish
- This will now import those settings into the policy. It will create nested folders (known as Collection in the GPE) for each registry key. These “Collections” are purely for administrative ease and can be renamed/moved/deleted as necessary.
- We also use Office XP (aka 2000) and Office 2003. This involves the same steps as above only the registry keys & values are slightly different
- Office 2003 Key: HKEY_CURRENT_USERSoftwareMicrosoftOffice11.0CommonMailSettings
- Office 2003 Values: ComposeFontSimple and ReplyFontSimple
- Office XP Key: HKEY_CURRENT_USERSoftwareMicrosoftOffice9.0OutlookPreferences
- Office XP Values: ReplyFont and SendFont
- That is all that needs to be done.
- It will take effect the next time a users policy is refreshed and they restart Outlook.
- Note; This does not prevent a user from changing a font in the email editor or in Outlook’s “options” menu but it will reset the next time the policy is refreshed and Outlook is restarted
Forcing Outlook’s Theme & Stationery
Group Policy Policies use Administrative Templates to provide policies for Windows. You can download the office templates as part of the Office Resource Kit.
Vista & 2008 introduced a more standardised and flexible xml-based template format known as admx files. If you don’t have any of these Operating systems you will need to use the text based adm files. I will show both methods in this article
Creating a custom ADM file for Outlook 2003
- Open notepad and save the following text as OfficeTweaks.adm
- CLASS USER
- CATEGORY !!CustomUserSettings
CATEGORY !!OutlookVersion
POLICY !!DisableNewStationery
EXPLAIN !!DisableNewStationery_Explain
KEYNAME "SoftwarePoliciesMicrosoftOffice11.0CommonMailSettings"
VALUENAME "NewStationery"
VALUEON ""
VALUEOFF NUMERIC 1
END POLICY
END CATEGORY
END CATEGORY
[strings]
CustomUserSettings="Custom User Settings"
OutlookVersion="Outlook 2003"
DisableNewStationery="Disable Modify Default Stationery"
DisableNewStationery_Explain="Enabled – Any Changes made to the user’s Stationery will be ignored by Outlook. Disabled – No effect. Not Configured – Removes policy."
- CATEGORY !!CustomUserSettings
- Open the policy you created for the Font Preferences
- Go to User Configuration > Policies > Administrative Templates
- Right-click Administrative Templates > Add/Remove Templates…
- Click on Add and browse to the OfficeTweaks.adm file
- If there are no errors in the text file it will appear under the Classic Administrative Templates node in the GPE
Creating a custom ADMX file for Outlook 2007
This method uses the wonderful ADMX Editor (aka Migrator) mmc snap-in available here. We could use this to convert the adm above to admx but it doesn’t like the blank ON value. Luckily it is very easy to create an admx from scratch using this tool
- Open FullArmor ADMX Editor
- Create a new template e.g. Company Tweaks
- Create a new category e.g. Office 2007
- Create a new Policy Setting
- Display Name: Ignore Legacy Stationery
- Registry Key: SoftwarePoliciesMicrosoftOffice12.0CommonMailSettings
- Registry Value Name: NewStationery
- Class: User
- Click OK
- Any further editing is now done in the lower pane of the mmc
- We now need to set the enabled and disabled values on the “Values” tab
- Enabled Value
- Type: Numeric
- Value: 1
- Disabled Value
- Type: Deleted
- You can also set a description on the “Explain” tab and specify what OS is required in the “Supported On” tab
- Do the same steps as above to disable Themes but change these settings, the rest is identical.
- Display Name: Ignore Legacy Themes
- Registry Value Name: NewTheme
- When done, right-click the Company Tweaks template node and choose “Save As”
- This will create the admx file as well as the adml language specific file (defaults to en-us)
- Make sure you save it in the central ADMX repository so it can be found from any server e.g. \ServerNameSYSVOLDomainPoliciesPolicyDefinitions
- I have included the XML code below in case you have have any problems
- CompanyTweaks.admx
- CompanyTweaks.adml
Restrict Legacy Stationery
This policy settings allows you to manage if legacy Stationery is allowed in Outlook 2007 emails.
If you enable this policy setting, any changes a user makes to their Stationery will be ignored by Outlook.
If you disable this policy setting, it has no effect
If you do not configure this policy setting, the restriction will be removedSee also "Restrict Message Themes" policy
- CompanyTweaks.admx
