How to restrict local administrator group?
The following steps will need to be applied to a GPO that is applied to the computer objects you want to control the local administrator groups. Note: You must make sure you don’t have any other Group Policy “Restricted Groups” settings applied to your computers as they will always override the group policy preferences settings.
Step 1. Open the Group Policy Management Consol and edit the group policy that is applied to the scope of computers that you want to control.
Step 2. Go to the Computer Configuration --> Preferences --> Control Panel Settings --> Local User and Groups option.
Step 3. Now click on Actions --> New --> Local Group
Step 4. Now you will be need to select “Administrators (built-in)” from the group name as this always selects the built-in administrators group even if you have renamed it to obfuscate the name of the admin account.
Step 5. Tick both “Delete all member users” and “Delete all member groups”. These two options will automatically remove any users or groups that are not explicitly being added to the group. You only need to do this on item number 1 in the list of settings as that setting will be processed last.
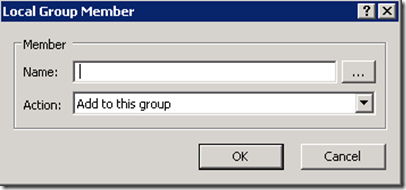
Step 6. Now you will need to make sure you have added back in the Domain Admin’s and Local Administrator groups so that you don’t totally lock yourself out of the computer. To do this click the “Add…” button to bring up the “Local Group Member” dialogue box (see figure 2)

Figure 2. Local Group Member
Step 7. Now type “BuiltIn\Administrator” in the Name field and click OK (see Figure 3.)
Note: The image below is wrong… it should be “BUILTIN\Administrator”

Figure 3. Local Administrators group added to the local administrators group
Step 8. You should also add “DOMAINNAME\Domain Admins” as it is a good practice to have the DA account as a member of the local admin group on all computers in the domain. To do this we are going to use the DomainName variables. Click “Add…” again and now click in the “Name:” text field and then press F3. This will now bring up the “Select Variable” dialogue box (See Figure 4.). Click on the “DomainName” field and press “Select” and then “OK”. (alternatively you could type %DomainName% in the name field and just press OK.)
Note: The image below is also wrong… The bottom image should be “BUILTIN\Administrator”

Figure 4. Selecting the DomainName Variable
You should now see the following which will restrict the local administrator group to only have the Domain Admins and the local administrator.
Note: The image below is wrong. It should be “BUILTIN\Administrator”

Figure 5. Basic local administration group setting
The following steps will need to be applied to a GPO that is applied to the computer objects you want to control the local administrator groups. Note: You must make sure you don’t have any other Group Policy “Restricted Groups” settings applied to your computers as they will always override the group policy preferences settings.
Step 1. Open the Group Policy Management Consol and edit the group policy that is applied to the scope of computers that you want to control.
Step 2. Go to the Computer Configuration --> Preferences --> Control Panel Settings --> Local User and Groups option.
Step 3. Now click on Actions --> New --> Local Group
Step 4. Now you will be need to select “Administrators (built-in)” from the group name as this always selects the built-in administrators group even if you have renamed it to obfuscate the name of the admin account.
Step 5. Tick both “Delete all member users” and “Delete all member groups”. These two options will automatically remove any users or groups that are not explicitly being added to the group. You only need to do this on item number 1 in the list of settings as that setting will be processed last.
Step 6. Now you will need to make sure you have added back in the Domain Admin’s and Local Administrator groups so that you don’t totally lock yourself out of the computer. To do this click the “Add…” button to bring up the “Local Group Member” dialogue box (see figure 2)

Figure 2. Local Group Member
Step 7. Now type “BuiltIn\Administrator” in the Name field and click OK (see Figure 3.)
Note: The image below is wrong… it should be “BUILTIN\Administrator”

Figure 3. Local Administrators group added to the local administrators group
Step 8. You should also add “DOMAINNAME\Domain Admins” as it is a good practice to have the DA account as a member of the local admin group on all computers in the domain. To do this we are going to use the DomainName variables. Click “Add…” again and now click in the “Name:” text field and then press F3. This will now bring up the “Select Variable” dialogue box (See Figure 4.). Click on the “DomainName” field and press “Select” and then “OK”. (alternatively you could type %DomainName% in the name field and just press OK.)
Note: The image below is also wrong… The bottom image should be “BUILTIN\Administrator”

Figure 4. Selecting the DomainName Variable
You should now see the following which will restrict the local administrator group to only have the Domain Admins and the local administrator.
Note: The image below is wrong. It should be “BUILTIN\Administrator”

Figure 5. Basic local administration group setting
No comments:
Post a Comment