Network Load Balancing (NLB) is a feature available to computers that run the Windows Server operating system. NLB uses a distributed algorithm to balance an IP traffic load across multiple hosts. It helps to improve the scalability and availability of business-critical, IP-based services. NLB also provides high availability, because it detects host failures and automatically redistributes traffic to surviving hosts.
Before you deploy NLB, you need to have a firm understanding of the types of server workloads for which this high availability technology is appropriate. If you do not understand NLB functionality, you might deploy it in a manner that does not accomplish your overall objectives. For example, you need to understand why NLB is appropriate for web applications, but not for Microsoft SQL Server databases.
For more information : Please log in to : http://technet.microsoft.com/en-us/library/cc732855(v=ws.10).aspx
For this NLB demo this time, i will be using 3 Server, which is 1 Domain Server and 2 Member Server.
1st – In the 1st step lets implementing an NLB Cluster
1 – Before we continue with the deployment, we need to verify our website functionality…
2 – To verify our website functionality, log in to SVR01 server, open iis file (which is in the format of .bmp), the file suppose to be located in c:\inetpub\wwwroot.
3 – To simulate this demo, please make some adjustment to the iis.bmp file (Refer to pic), and then save the iis file.

4 – Now switch to Domain Server (DC01), open IE and type the address http://LON-SVR1.
** Verify that the webpage displays the IIS logo with the yellow color mark that you added…
5 – Still in the IE, enter the address http://LON-SVR2, and then press Enter. Verify that the webpage does not display the marked IIS logo.

2nd – Our next step is to Install NLB services
1 – Now switch to LON-SVR1 server and open Windows PowerShell ISE…

2 – In the Windows PowerShell ISE type :
Invoke-Command -Computername LON-SVR1,LON-SVR2 -command {Install-WindowsFeature NLB,RSAT-NLB}

3 – Once the process complete, open Server Manager, click Tools and verify that Network Load Balancing Manager is installed…
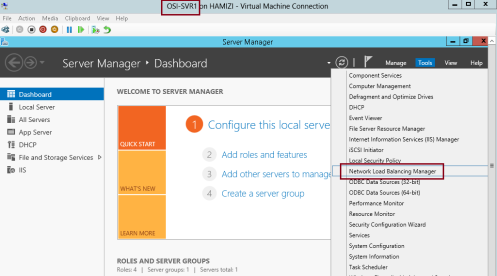
4 – Now switch to SVR2, open Server Manager, click Tools and verify also that Network Load Balancing Manager is installed…

3rd – Create a new Windows Server 2012 NLB cluster
1 – On SVR1 server, in the Windows PowerShell ISE, type :
New-NlbCluster -InterfaceName “Ethernet” -OperationMode Multicast -ClusterPrimaryIP 172.16.0.42 -ClusterName MCT-NLB

2 – Once the command complete, still in the Windows PowerShell ISE, type :
Invoke-Command -Computername LON-DC1 -command {Add-DNSServerResourceRecordA – zonename adatum.com –name MCT-NLB –Ipv4Address 172.16.0.42}

3 – Now to add add a second host to the cluster, still in Windows PowerShell ISE, type :
Add-NlbClusterNode -InterfaceName “Ethernet” -NewNodeName “LON-SVR2” – NewNodeInterface “Ethernet”

4th – Its time to validate the NLB cluster…
1 – On the SVR1 Server, open Server Manager, click the Tools, and then click Network Load Balancing Manager…

2 – In the Network Load Balancing Manager console, verify that nodes LON-SVR1 and LON-SVR2 display with the status of Converged for the MCT-NLB cluster.

3 – Next, right-click the MCT-NLB cluster, and then click Cluster properties…

4 – In the MCT-NLB(172.16.0.42), on the Cluster Parameters tab, verify that the cluster is set to use the Multicast operations mode…

5 – On the Port Rules tab, verify that there is a single port rule named All that starts at port 0 and ends at port 65535 for both TCP and UDP protocols, and that it uses Single affinity…

4th – Configuring and Managing the NLB Cluster
1 – Before we start configure and manage the NLB Cluster, log on to SVR2 server, and create 1 folder named porttest in C:\
2 – then copy all c:\inetpub\wwwroot to c:\porttest folder
3 – Open PowerShell and type :
New-Website –Name PortTest –PhysicalPath “C:\porttest” –Port 5678
New-NetFirewallRule –DisplayName PortTest –Protocol TCP –LocalPort 5678

4 – Next, open porttest folder, and then double-click iis file…

5 – Make some modification to mark the IIS logo and save the file…

6 – Now switch to Domain Server and in the IE type http://LON-SVR2:5678…
** Verify that the IIS Start page with the IIS logo distinctively marked with RED displays.

7 – Now switch back to SVR1 server and open Network Load Balancing Manager, in the Network Load Balancing Manager console, right-click MCT-NLB, and then click Cluster Properties…
** In the MCT-NLB(172.16.0.42), on the Port Rules tab, select the All port rule, and then click Remove…

8 – On the Port Rules tab, click Add…

9 – In the Add/Edit Port Rule box, enter the following information, and then click OK:
• Port range: 80 to 80
• Protocols: Both
• Filtering mode: Multiple Host
• Affinity: None

10 – On the Port Rules tab, click Add again….
** In the Add/Edit Port Rule box, enter the following information, and then click OK:
• Port range: 5678 to 5678
• Protocols: Both
• Filtering mode: Single Host

11 – Click OK to close the MCT-NLB(172.16.0.42)…
12 – In the Network Load Balancing Manager console, right-click LON-SVR1, and then click Host Properties…

13 – On the Port Rules tab, click the port rule that has 5678 as the Start and End value, and then click Edit…

14 – Click the Handling priority value, and change it to 10 and click OK twice to close…

5th – Validate port rules
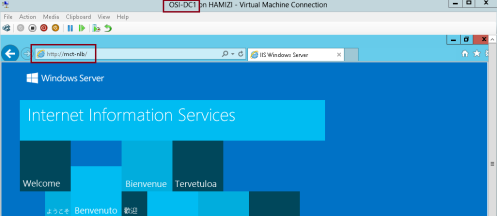
1 – To validate port rules, switch to DC01 Server, in IE type http://mct-nlb, and then Refresh the site few times and verify that you see web pages with and without the distinctive Yellow marking.

2 – Next, still in IE enter the address http://mct-nlb:5678 and and then Refresh the site few times and verify that you see web site with the RED marking…

6th : Manage host availability in the NLB cluster
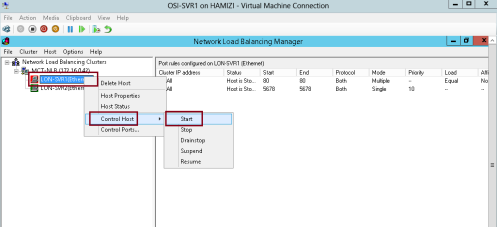
1 – Switch to SVR1 server, in the Network Load Balancing Manager console, right-click LON-SVR1, click Control Host, and then click Suspend…

2 – Click the MCT-NLB node.
** Verify that node LON-SVR1 displays as Suspended, and that node LONSVR2 displays as Converged.
3 – Right-click LON-SVR1, click Control Host, and then click Resume…

4 – Right-click LON-SVR1, click Control Host, and then click Start…
5 – Click the LON-NLB node.
** Verify that both nodes LON-SVR1 and LON-SVR2 now display as Converged. You might have to refresh the view…

6th : Validate website availability when the host is unavailable
1 – Restart SVR1 server and then switch to DC01 server and in the IE type http://mct-nlb..
** Refresh the website few times.
** Verify that the website is available while SVR1 reboots, but that it does not display the distinctive YELLOW mark on the IIS logo until SVR1 has restarted.
While SVR1 restarted..
After SVR1 restarted…

2 – Once the SVR1 restarted, log in and open Network Load Balancing Manager, in the Network Load Balancing Manager console, right-click LON-SVR2, click Control Host, and then click Drainstop…
** Then switch back to DC01 and refresh the website few times and verify that in the website YELLOW IIS logo displays
** The Drainstop action blocks all new connections without terminating existing sessions

Before you deploy NLB, you need to have a firm understanding of the types of server workloads for which this high availability technology is appropriate. If you do not understand NLB functionality, you might deploy it in a manner that does not accomplish your overall objectives. For example, you need to understand why NLB is appropriate for web applications, but not for Microsoft SQL Server databases.
For more information : Please log in to : http://technet.microsoft.com/en-us/library/cc732855(v=ws.10).aspx
For this NLB demo this time, i will be using 3 Server, which is 1 Domain Server and 2 Member Server.
1st – In the 1st step lets implementing an NLB Cluster
1 – Before we continue with the deployment, we need to verify our website functionality…
2 – To verify our website functionality, log in to SVR01 server, open iis file (which is in the format of .bmp), the file suppose to be located in c:\inetpub\wwwroot.
3 – To simulate this demo, please make some adjustment to the iis.bmp file (Refer to pic), and then save the iis file.

4 – Now switch to Domain Server (DC01), open IE and type the address http://LON-SVR1.
** Verify that the webpage displays the IIS logo with the yellow color mark that you added…
5 – Still in the IE, enter the address http://LON-SVR2, and then press Enter. Verify that the webpage does not display the marked IIS logo.

2nd – Our next step is to Install NLB services
1 – Now switch to LON-SVR1 server and open Windows PowerShell ISE…

2 – In the Windows PowerShell ISE type :
Invoke-Command -Computername LON-SVR1,LON-SVR2 -command {Install-WindowsFeature NLB,RSAT-NLB}

3 – Once the process complete, open Server Manager, click Tools and verify that Network Load Balancing Manager is installed…

4 – Now switch to SVR2, open Server Manager, click Tools and verify also that Network Load Balancing Manager is installed…

3rd – Create a new Windows Server 2012 NLB cluster
1 – On SVR1 server, in the Windows PowerShell ISE, type :
New-NlbCluster -InterfaceName “Ethernet” -OperationMode Multicast -ClusterPrimaryIP 172.16.0.42 -ClusterName MCT-NLB

2 – Once the command complete, still in the Windows PowerShell ISE, type :
Invoke-Command -Computername LON-DC1 -command {Add-DNSServerResourceRecordA – zonename adatum.com –name MCT-NLB –Ipv4Address 172.16.0.42}

3 – Now to add add a second host to the cluster, still in Windows PowerShell ISE, type :
Add-NlbClusterNode -InterfaceName “Ethernet” -NewNodeName “LON-SVR2” – NewNodeInterface “Ethernet”

4th – Its time to validate the NLB cluster…
1 – On the SVR1 Server, open Server Manager, click the Tools, and then click Network Load Balancing Manager…

2 – In the Network Load Balancing Manager console, verify that nodes LON-SVR1 and LON-SVR2 display with the status of Converged for the MCT-NLB cluster.

3 – Next, right-click the MCT-NLB cluster, and then click Cluster properties…

4 – In the MCT-NLB(172.16.0.42), on the Cluster Parameters tab, verify that the cluster is set to use the Multicast operations mode…

5 – On the Port Rules tab, verify that there is a single port rule named All that starts at port 0 and ends at port 65535 for both TCP and UDP protocols, and that it uses Single affinity…

4th – Configuring and Managing the NLB Cluster
1 – Before we start configure and manage the NLB Cluster, log on to SVR2 server, and create 1 folder named porttest in C:\
2 – then copy all c:\inetpub\wwwroot to c:\porttest folder
3 – Open PowerShell and type :
New-Website –Name PortTest –PhysicalPath “C:\porttest” –Port 5678
New-NetFirewallRule –DisplayName PortTest –Protocol TCP –LocalPort 5678

4 – Next, open porttest folder, and then double-click iis file…

5 – Make some modification to mark the IIS logo and save the file…

6 – Now switch to Domain Server and in the IE type http://LON-SVR2:5678…
** Verify that the IIS Start page with the IIS logo distinctively marked with RED displays.

7 – Now switch back to SVR1 server and open Network Load Balancing Manager, in the Network Load Balancing Manager console, right-click MCT-NLB, and then click Cluster Properties…
** In the MCT-NLB(172.16.0.42), on the Port Rules tab, select the All port rule, and then click Remove…

8 – On the Port Rules tab, click Add…

9 – In the Add/Edit Port Rule box, enter the following information, and then click OK:
• Port range: 80 to 80
• Protocols: Both
• Filtering mode: Multiple Host
• Affinity: None

10 – On the Port Rules tab, click Add again….
** In the Add/Edit Port Rule box, enter the following information, and then click OK:
• Port range: 5678 to 5678
• Protocols: Both
• Filtering mode: Single Host

11 – Click OK to close the MCT-NLB(172.16.0.42)…

12 – In the Network Load Balancing Manager console, right-click LON-SVR1, and then click Host Properties…

13 – On the Port Rules tab, click the port rule that has 5678 as the Start and End value, and then click Edit…

14 – Click the Handling priority value, and change it to 10 and click OK twice to close…

5th – Validate port rules
1 – To validate port rules, switch to DC01 Server, in IE type http://mct-nlb, and then Refresh the site few times and verify that you see web pages with and without the distinctive Yellow marking.

2 – Next, still in IE enter the address http://mct-nlb:5678 and and then Refresh the site few times and verify that you see web site with the RED marking…

6th : Manage host availability in the NLB cluster
1 – Switch to SVR1 server, in the Network Load Balancing Manager console, right-click LON-SVR1, click Control Host, and then click Suspend…

2 – Click the MCT-NLB node.
** Verify that node LON-SVR1 displays as Suspended, and that node LONSVR2 displays as Converged.

3 – Right-click LON-SVR1, click Control Host, and then click Resume…

4 – Right-click LON-SVR1, click Control Host, and then click Start…

5 – Click the LON-NLB node.
** Verify that both nodes LON-SVR1 and LON-SVR2 now display as Converged. You might have to refresh the view…

6th : Validate website availability when the host is unavailable
1 – Restart SVR1 server and then switch to DC01 server and in the IE type http://mct-nlb..
** Refresh the website few times.
** Verify that the website is available while SVR1 reboots, but that it does not display the distinctive YELLOW mark on the IIS logo until SVR1 has restarted.
While SVR1 restarted..

After SVR1 restarted…

2 – Once the SVR1 restarted, log in and open Network Load Balancing Manager, in the Network Load Balancing Manager console, right-click LON-SVR2, click Control Host, and then click Drainstop…
** Then switch back to DC01 and refresh the website few times and verify that in the website YELLOW IIS logo displays
** The Drainstop action blocks all new connections without terminating existing sessions

No comments:
Post a Comment