Thursday, August 31, 2017

Hyper-V File Storage and Permissions

Introduction


Hyper-V takes a different approach to virtual machine file storage than Virtual Server 2005 R2. The default locations are different, the storage approach is different, and the configuration files are different. What does this mean to the seasoned Virtual Server 2005 R2 administrator? It means that you will need to start with a fresh slate and learn how it all works. So let us dive in.

Service SIDS


To allow all of the file storage and access changes, Hyper-V leverages a new type of SID added to Windows Server 2008 called a Service SID to control access to virtual machine files. A virtual machine gets a GUID when created and a corresponding unique Service SID is created for the virtual machine using a combination of the Service SID ""NT VIRTUAL MACHINE" and the VMGUID.

Example: "NT VIRTUAL MACHINE\ C64FB013-6D92-4B9B-B106-690182B00FFA "
If you look at the files of a virtual machine you will see the permissions show an entry for the VMGUID with security permissions assigned, this is the Service SID that is assigned to the virtual machine. Let’s refer to this service SID as the VMSID.

You can use iCACLS to set and view the permissions on files:

icacls "C:\Programdata\Microsoft\Windows\Hyper-V\Virtual Machines\ C64FB013-6D92-4B9B-B106-690182B00FFA.xml" /grant "NT VIRTUAL MACHINE\ C64FB013-6D92-4B9B-B106-690182B00FFA":(F) /L

The figure below shows an example of a VMSID assigned permissions to a virtual hard disk.
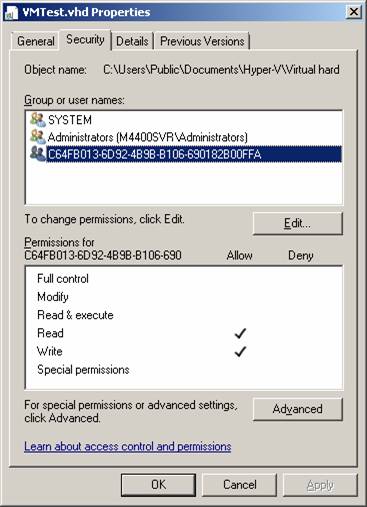


Figure 1

If the VMSID is ever removed from the security permissions of a file that makes up the virtual machine, taking the virtual hard disk as an example, the virtual machine cannot power on.


A special group called Virtual Machines is also created to contain all the virtual machines Service SIDS registered on the Hyper-V server.

Default File Locations


Hyper-V consists of the following default file configuration locations for storing virtual machine files:


  • Default virtual hard disk storage location - C:\Users\Public\Documents\Hyper-V\Virtual Hard Disks
  • Default virtual machine storage location - C:\ProgramData\Microsoft\Windows\Hyper-V

These can be modified using the Hyper-V Settings option in the Hyper-V Manager MMC shown below:
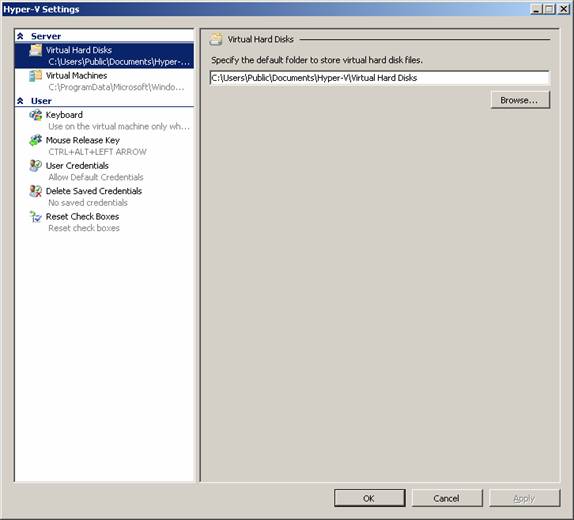


Figure 2

When Hyper-V is installed, these folders are created. The Virtual Hard Disks folder is initially empty but the default virtual machine storage location folder contains two subfolders:


  1. Virtual Machines – Stores the virtual machine configuration files
  2. Snapshots – Stores the snapshot files taken of a virtual machine

It is your choice to use the default locations or to specify a different path to store the virtual machine files when creating a virtual machine using the wizard. Your selection results in different actions being taken from a file security perspective.

Let us discuss the two scenarios of the default locations and specifying a different storage location.

Scenario 1: Using the default locations


If you use the default locations during the creation of a virtual machine using the New Virtual Machine wizard, the following happens.


  1. A GUID is generated and assigned to the virtual machine and a VMSID is generated for permissions use. The term VMGUID will be used to refer to the virtual machines GUID in this article.

  2. The virtual hard disk (VHD) for the virtual machine is placed in the C:\Users\Public\Documents\Hyper-V\Virtual Hard Disks directory using the filename you specified.

  3. The VHD security permissions are modified to add the VMSID with Read and Write access to the VHD.

  4. A XML configuration file a filename consisting of the VMGUID with an XML extension is created in the C:\ProgramData\Microsoft\Windows\Hyper-V folder.

  5. A subfolder is created in the C:\ProgramData\Microsoft\Windows\Hyper-V\Virtual Machines directory consisting of the VMGUID as the folder name and the following permissions are assigned. This folder is used to store the saved state files (VSV and BIN).
    a.       Virtual Machines group is assigned the following special permissions that inherit to the folder and sub folders
    i.      List folder / read data
    ii.     Read attributes
    iii.    Read extended attributes
    iv.    Create files /  write data
    v.     Create folders / append data
    vi.    Read
    b.      The VMSID is assigned and given Full control special permissions for the folder only.
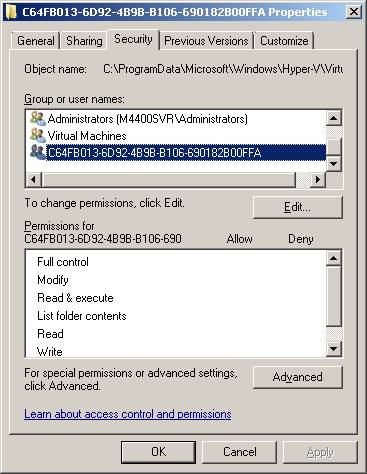


Figure 3


If you save the state of the virtual machine, the save state files are stored in the C:\ProgramData\Microsoft\Windows\Hyper-V\Virtual Machines\[VMGUID] folder.

This approach has the following advantages:


  1. You do not have to think about where you store files – the defaults are used automatically.

  2. Everything is stored in two directories.

This approach also has the following disadvantages:


  1. The virtual machine VHD, configuration files, save state files and snapshots are all stored on the system drive. This will cause the drive to run out of disk space quickly.

  2. Different virtual machines files are stored together making it harder to track the associations and troubleshoot permissions.

Scenario 2: Using a different storage location


When you use the New Virtual Machine wizard, you have the option of specifying a different location to store the virtual machine files. You enable this option by enabling the checkbox called Store the virtual machine in a different location and then provide the alternate path in the Location text box.


Figure 4

When you use an alternate storage location for your virtual machine files, permissions and files are created differently.


  1. The VMGUID is still generated and assigned to the virtual machine and a VMSID is generated for permissions use.

  2. Instead of folders being created in the default locations, a subfolder is created in the alternate location specified using the name of the virtual machine as the folder name.
    a.       So if you had specified a virtual machine name of VMTEST and an alternate location of D:\VMs, a new folder called D:\VMs\VMTEST would be created.

  3. The VMTEST folder is assigned the following special permissions
    a.       Virtual Machines group is assigned the following special permissions that inherit to the folder and sub folders.
    i.      List folder / read data
    ii.     Read attributes
    iii.    Read extended attributes
    iv.     Create files /  write data
    v.      Create folders / append data
    vi.     Read

  4. Inside the VMTEST folder, the two subfolders Virtual Machines and Snapshots are created and assigned the following permissions: The VMSID is assigned and given Full control special permissions for the folder only

  5. The VHD created by the New Virtual machine Wizard is placed in the D:\VMs\VMTEST folder and assigned the following permissions: The VMSID is given Read and Write permissions

  6. The virtual machine XML configuration file consisting of the VMGUID with an XML extension is created in the D:\VMs\VMTEST\Virtual Machines folder and assigned the following permissions: The VMSID is assigned Full Control permissions

  7. A subfolder with the name VMGUID is created in the D:\VMs\VMTEST\Virtual Machines folder and assigned the following permissions:
    a.       The subfolder inherits the Virtual Machines group permissions
    i.      List folder / read data
    ii.     Read attributes
    iii.    Read extended attributes
    iv.    Create files /  write data
    v.     Create folders / append data
    vi.    Read
    b.      The VMSID is assigned Full control special permissions for the folder only

Hyper-V looks for the configuration file in the default folder C:\ProgramData\Microsoft\Windows\Hyper-V\Virtual Machines, but since the configuration file is stored in the D:\VMs\VMTest\Virtual Machines folder Hyper-V needs a way to reference the configuration file from the default location. This is where symbolic links are employed. If the virtual machine is not stored in the default location, Hyper-V will create a symbolic link to the actual location of the xml configuration file.

Symbolic links are created with the MKLINK command:

mklink "C:\Programdata\Microsoft\Windows\Hyper-V\Virtual Machines\C64FB013-6D92-4B9B-B106-690182B00FFA.xml" "D:\VMTEST\Virtual Machines\C64FB013-6D92-4B9B-B106-690182B00FFA.xml"

For example, if the configuration is stored in D:\VMs\VMTest\Virtual Machines, Hyper-V will create a symbolic link in the C:\ProgramData\Microsoft\Windows\Hyper-V\Virtual Machines folder using the VMGUID as the name of the link. The link will have a pointer to the actual storage location.

If you create a snapshot, then Hyper-V will also create a symbolic link in the C:\ProgramData\Microsoft\Windows\Hyper-V\Snapshots folder to the snapshot version of the configuration xml file in the D:\VMs\VMTest\Snapshots folder.

This approach has the following advantages:


  1. All files for a virtual machine are stored in one folder hierarchy that is rooted with the name of the virtual machine

  2. You can place the virtual machine files on any available drive

  3. Automatic organization of the folders.

This approach has the following disadvantages:


  1. The additional symbolic links that need to be created and managed

  2. You must remember to use the different storage path when you create a new virtual machine

Conclusion


Hyper-V virtual machine file storage and permissions provides two approaches to managing the virtual machine files. Using the default folders makes it easy to create virtual machines, but places the Hyper-V server at constant risk of running out of disk space on the system volume. Using the alternate storage location eliminates the system volume disk issue and provides better organization of the virtual machines storage, but increases the complexity of the storage approach. I personally would always recommend the use of the different storage path

How can I change the Disk ID of a drive?

In some cases if a VM has the same Disk ID as the host, Microsoft VSS will fail and thus backups will not be successful. In such cases you will need to change the Disk ID as below.


To view the Disk ID:
  1. Open Command prompt
  2. Enter the command  DISKPART and hit enter
  3. Enter the command  LIST DISK  and hit enter to list all available disks
  4. Enter  SELECT DISK X (Substitute  "X" for the number of the disk you wish to select) and hit enter
  5. Enter  UNIQUEID DISK  and hit enter
  6. A four byte disk ID will be returned, for example: "e9eb3aa5"

To Change the Disk ID:
    1. Open Command prompt 
    2. Enter the command  DISKPART and hit enter
    3. Enter the command  LIST DISK  and hit enter to list all available disks
    4. Enter  SELECT DISK X (Substitute  "X" for the number of the disk you wish to select)
    5. Enter UNIQUEID DISK ID=a4e19dc0 and hit enter
    6. This will change the Disk ID to "a4e19dc0"
    7. Enter  UNIQUEID DISK  and hit enter to view the new Disk ID


    Note

    Please be advised that changing the Disk ID of a volume hosting the OS is not recommended as it will cause the machine not to boot.

    Hyper-V backups using Backup Exec 2012 fails to create snapshot indicating a disk signature collision.

    Problem

    When performing a backup of Hyper V virtual machines the backup jobs may fail while creating snapshots and indicating that disk signatures for vhd's are colliding.

    Error Message

    \\\Hyper-V?Virtual?Machine\machine-name>". Snapshot technology used: Microsoft Volume Shadow Copy Service (VSS).
    A snapshot could not be created.  The most probable cause is a disk signature collision between two or more VHDs that are assigned to the virtual machine.
     

    0xa0009650 - A snapshot could not be created.  The most probable cause is a disk signature collision between two or more VHDs that are assigned to the virtual machine.
    Also seen error:
    0xa0009651 - A snapshot could not be created.  The most probable cause is a disk signature collision between a VHD that is assigned to the virtual machine and physical disk mounted on the Hyper-v host. 

    Cause

    1. The disk signatures for the virtual machine's (vhd's) are colliding.
    2. The Hyper-V writers on the host machine are failing during the backup process.
    3. If the disk space of the VM doesn't have enough disk space.
    4. Using multi path i/o configuration which creates two identical disks of which one is active and one is passive (seen by IBM but other vendor might have the same configuration).

    Solution

    1. Check and Fix the Disk Signature Conflict. 
           To check Disk Signature or ID use the Windows DISKPART utility commands "detail disk" and "uniqueid".
           Refer to the following image. The "Disk Id" should be unique.
            Contact Microsoft Support for further assistance changing the Disk Signature.

    1. Check the writer status on the Hyper V host machine.
             Reboot the server to check if the writers are stable, re run the backup job.
             If writers continue to fail, Contact Microsoft Technical Support to resolve the issue with the writers.

    1. Clear up additional space on the VM if it's out of space. 

        4.      Install an additional IBM driver specific for multi path i/o configuration (for more detailed information where to find the driver please contact your vendor)

    Tuesday, August 15, 2017

    Warning "Snapshot provider error 0xe00008526. Backup Exec could not locate a VSS software or hardware snapshot provider for this job."

    Problem

    Backup Exec unable to locate snapshot providers installed on the computer.

    Error Message

    V-79-57344-34086 - AOFO: Initalization failure on: "C:". AOFO used: Microsoft VSS. Snapshot provider error 0xe0008526: Backup Exec could not locate a VSS software or hardware snapshot provider for this job. Select a valid VSS snapshot provider for the target computer.


    Application Log :
    Log Name: Application
    Source: VSS
    Event ID: 7001
    Computer:
     
    Description:
    VssAdmin: Unable to create a shadow copy: The volume shadow copy provider is not registered in the system.
    Command-line: 'C:\Windows\system32\vssadmin.exe Create Shadow /AutoRetry=15
    C: Drive properties window shows error about VSS Provider:
    1. Go to Windows Explorer
    2. Right click on C: drive
    3. Click " Shadow Copies" tab.
    4. Check for this error:
    Initialization Failed:
    Error: 0x80042304 : The volume shadow copy provider is not registered in the system.

    Cause

    The snapshot provider selected for the backup job is not installed on the server being backed up.

    Solution

    1.  Check that snapshot providers are installed on the system being backed up.
    • Open a command prompt.
    • Type "vssadmin list providers"
    • If nothing is returned, then there is most likely an issue with VSS that will most likely need assistance from Microsoft to resolve
      • You can also verify that VSS is properly registered by checking the following registry key:
        •  HKEY_LOCAL_MACHINE\SYSTEM\CurrentControlSet\services\VSS\Providers\{b5946137-7b9f-4925-af80-51abd60b20d5}
    • If writers not listed or show they are in an error state, reboot the server and run the command again


    2.  Change the backup job to use a specific snapshot provider.
    •  Open the backup job properties.
    •  Navigate to Advance Open File.
    •  Confirm the "Use advanced open file option" is checked.
    •  Select the appropriate snapshot provider - "Microsoft Volume Shadow Copy Service" with "System" selected in the pull down menu is typically best:


    Hyper-V Virtual Machine Error 0x80070569

    If you find you are getting a similar error 0x80070569 on Hyper-V 2012, you might be experiencing something similar to this.
    Try restarting the Hyper-V Virtual Machine Management Service.


    I wasn't sure if I could restart this service while I had Virtual Machines running, but since it was on my home lab environment, I thought I'd give it a shot. The service restarted with no issues on any of my virtual machines. What's more, when I tried to create a virtual machine, it worked, no error. I'm not sure why this happens or why restarting the service fixes it as it seems by the error to be a permissions issue but as a work around it seems to do the trick.

    Since installing Backup Exec FP3 Hyper-V backup jobs leave a checkpoint against the virtual machine

    Problem

    Before installing Backup Exec 15 Feature Pack 3 (FP3) , a Hyper-V backup job created a checkpoint (usually visible in the Hyper-V manager). This checkpoint results in the creation of  an AVHDX file against each VHDX file inside the storage containing the virtual machine (VM). However at the end of the backup job the checkpoint and associated AVHDX files are merged and removed/deleted.

    Since installing FP3, it can be seen that Hyper-V backups now create a checkpoint (and associated AVHDX files), however even when the backup job finishes, a checkpoint now remains linked to the VM although the checkpoint will be updated during subsequent backup processes.

    NOTE: Backup Exec 15 Feature Pack 4 (FP4) and later updates or later Backup Exec versions may also see such symptoms, although the default setting for FP4 and later depends on which Feature Pack (FP) was installed prior to installing FP4 and if it was installed over an FP that already includes the choice, what the current setting for Hyper-V processing was prior to updating.

    Cause

    In the newer versions of Hyper-V, Microsoft have introduced a potentially faster method of performing incremental backups and Backup Exec 15 FP3 implements this new method as a server default (for Hyper-V 2012 and later installations) . This means all Hyper-V jobs (not just newly created jobs) on a given Backup Exec server will use the new settings immediately after FP3 is installed.

    The basic concept of the new method is:

        •    A child checkpoint (snapshot) is created to collect the changes.
        •    On incremental backup, a new child checkpoint is created for current changes and then the parent checkpoint is backed up.
        •    When the backup is complete, the child and parent checkpoint is merged leaving only the new combined checkpoint.
        •    This combined checkpoint remains on the system and is used as the new parent for the next backup.
        •    A full backup will backup the current complete state of the VM and not just the parent checkpoint


    Extra information:

    Within Backup Exec this new method is known as the Faster processing method for Incremental Hyper-V backups with the original method being called the Standard processing method

    Backup Exec has supported this new method since Backup Exec 2014 was released however Backup Exec 15 FP3 enabled it as the default method where prior to this, to enable it required the use of Powershell Commands (scripts) which are no longer needed against the FP3 (or later) updates.

    FP4 (and later) set the default Hyper-V processing Standard when installing over FP2 and earlier update levels, but honors the current setting when installing over FP3 (or later) update levels. 

    The backup job log will clearly show which method was used to perform the backup operation.

    With the faster method, a checkpoint is created and remains in place against the VM even if the backup strategy is to only run full backups.

    It is possible to revert to the Standard method (see information in the Solution section below), however, it should be noted that if reverting to the Standard method where at least one backup job with the Faster method has already run, then Powershell Commands will be needed to remove the Backup Checkpoints. Typically Hyper-V 2012 R2 installations will not remove the Backup Checkpoints when changing method, but Hyper-V 2012 installations usually will remove the Backup Snapshots. This is because Microsoft changed the behaviour (and the terminology) between these two Operating System versions.

    The AVHDX file is often referred to as a differencing disk

    The very first time a Faster method backup is performed against a VM, it will result in the Hyper-V-VMMS log on the host containing events 15070 and 10150,  reporting  errors of being unable to remove  a checkpoint. These errors can be ignored unless they happen during every backup operation.

    A restore from a backup set created using one method will still work if the server settings have been changed to the other method.

    If more than 1 backup checkpoint is present (when a backup job is not running) or more than 2 backup checkpoints present (when a backup job is running) then an issue has occurred that has blocked the removal of a checkpoint. As Backup Exec is calling Microsoft processes it is likely the cause is within the Operating System and not Backup Exec (unless you can see service stability issues against Backup Exec at the time of the backup.)
     

    Solution

    Backup Admins managing Hyper-V environments should choose between electing to continue using the default Faster method (in which case no further action is necessary) or reverting back to the Standard method. To revert to the Standard method perform the following steps:
    • In the Backup Exec console click the Backup Exec button (yellow button top left) and select Configuration and Settings —> Backup Exec Settings.
    • In the left sidebar of the Settings screen, click on Virtual Machines
    • Change the radio button in the Hyper-V, Incremental Backup Settings to “Use the standard processing method” and click OK
    • For Hyper-V Windows 2012 R2 installation then go to the Hyper-V host and open Powershell
    To merge and remove all snapshots use the command
    Get-VMSnapshot -VMName 'VM' -ComputerName 'HOST' | Remove-VMSnapshot
    although if there are manual checkpoints against the VM that need retaining the to remove just the Backup Checkpoints use the command
    Get-VMSnapshot -VMName 'VM' -ComputerName 'HOST' -SnapshotType Recovery | Remove-VMSnapshot

    Where VM represents the actual name of your virtual machines as seen in the Hyper-V Manager on the host and HOST represents the name of the Hyper-V host

    Note: these commands are case sensitive and can also be used to remove backup checkpoints that due to operating system errors have not been removed correctly. However, customers with these types of issue  should also review the Hyper-V-VMMS logs to understand what may have caused the condition.

    Saturday, August 12, 2017

    DFSR Event 5012 (DFS Replication)

    Summary

    DFS Replication failed to communicate with a replication group member because the member didn’t have the same configuration information. DFS Replication will retry this operation, which might resolve after configuration changes replicate through Active Directory Domain Services (AD DS).

    Causes

    DFS Replication could not establish a connection with the member. This error can occur for the following reasons:
    • An administrator recently made a configuration change or created a new replication group. If two replication group members obtain their configuration data from different domain controllers, they may have mismatched configuration data due to AD DS replication latencies.
    • An administrator altered AD DS permissions.


    Resolutions


    Wait for configuration changes to replicate with AD DS

    DFS Replication will retry this operation, which usually resolves automatically after configuration changes replicate through AD DS.
    To poll immediately for configuration changes, open a command prompt window and then type the following command once for each member of the replication group, where is the domain the server is located in and is the server name:
    Dfsrdiag PollAD /Member:\
    If this problem persists, verify that AD DS replication is working and that the service is able to reach a domain controller. If the problem persists for 8 hours, the DFS Replication service will disable the connection and log DFS Replication Event 5016.

    Test AD DS connectivity

    To test DFS Replication’s ability to communicate with AD DS, open a command prompt window and then type the following command: Dfsrdiag pollad /verbose. The command should report Operation Succeeded. If not, there is a problem communicating with AD DS.


    Verification

    To confirm that the issue is resolved, look for DFS Replication Event 5004 in the Event Viewer.crusoe
    To manually verify the replication topology, see Repair a Disconnected Topology (http://go.microsoft.com/fwlink/?LinkId=187103 )

    Friday, August 4, 2017

    Windows Server 2012 How To Create System Restore Point Using Windows Server Backup Feature

    In this article, let us see how to enable and use the backup features of Windows Server 2012/2016. Let us go step by step as usual.
    1. Go To Server Manager.
    clip_image002
    2. Click on Next.
    clip_image004
    3. Select Role-based or Feature based installation and click Next.
    clip_image006
    4. Select the Server and Click Next.
    clip_image008
    5. The default roles will be selected. Don’t bother about them and click next.
    clip_image010
    6. On the Features Wizard, Select the Windows Server Backup Feature and click Install.
    clip_image012
    7. Once, the installation completes, do a restart of the server and execute the below exe from the Run.
    clip_image013
    8. The following wizard will appear.
    clip_image015
    9. On the Right Panel, you will find various options like Backup Schedule, Backup Once, Recover etc., they are self-explanatory as the name explains. Now, let us go with a Backup Once option. For this wizard, I request you to follow the screen shots as there is no explanation required for them.
    clip_image017
    clip_image019
    clip_image021
    clip_image023
    clip_image025
    clip_image027
    Now, After the Backup, the System Restore Point will be Created.
    Issues faced while creating a Backup.
    1. Backup failed to complete. A Volume Shadow Copy Service Operation failed. Please check "VSS" and "SPP" application event logs for more information. Detailed error: The operation ended before completion.
    Looking into the EventVWR, the detailed exception was like
    The backup operation that started at '‎2013‎-‎10‎-‎08T07:37:24.827000000Z' has failed because the Volume Shadow Copy Service operation to create a shadow copy of the volumes being backed up failed with following error code '0x807800A1'. Please review the event details for a solution, and then rerun the backup operation once the issue is resolved.
    To resolve this, I had a look into the below link and got out.
    2. System Writer not found.
    This is one of the important exception, which I got struck for 2 days and after a long time, I found a useful link about this. There are already a lot of discussions are going on around this.
    And moreover, a recent patch for this from Microsoft can be downloaded from here.
    Install the hotfix and do a restart. System writer will be listed on your system. To confirm, run the command prompt as administrator and type “vssadmin list writers”.
    3. Make sure that, the VSS Service is running.
    Probably, that’s all about this. Please do let me know, if you feel that something has been missed.