Wednesday, December 26, 2018

Comparing Windows Kerberos and NTLM Authentication Protocols

Q: What are the main feature differences between the Windows Kerberos and NT LAN Manager (NTLM) authentication protocols? Why is the Kerberos protocol generally considered a better authentication option than the NTLM protocol?
A: NTLM is a challenge/response-based authentication protocol that is the default authentication protocol of Windows NT 4.0 and earlier Windows versions. For backward compatibility reasons, Microsoft still supports NTLM in Windows Vista, Windows Server 2003 and Windows 2003 R2, Windows 2000, and Windows XP.
Starting with Win2K, Microsoft implements Kerberos as the default authentication protocol for the Windows OS. This means that besides an NTLM authentication provider, every Windows OS since Win2K also includes a client Kerberos authentication provider.
Table 1, below, compares Kerberos to NTLM, the default authentication protocol of NT 4.0 and earlier Windows versions. The next paragraphs expand on some of the major feature differences (as listed in Table 1) between the Kerberos and the NTLM authentication protocols and explain why generally Kerberos is considered a better authentication option than NTLM.
  • Faster authentication. When a resource server gets Kerberos authentication information (in Kerberos speak "tickets" and "authenticators") from a client, the resource server has enough information to authenticate the client. The NTLM authentication protocol requires resource servers that aren't domain controllers (DCs), to contact a DC to validate a user's authentication request. This process is known as pass-through authentication. Thanks to its unique ticketing system, Kerberos doesn't need pass-through authentication and therfore accelerates the authentication process.
  • Mutual authentication. Kerberos can support mutual authentication. Mutual authentication means that not only the client authenticates to the service, but also the service authenticates to the client. Mutual authentication is a Kerberos option that the client can request. The support for mutual authentication is a key difference between Kerberos and NTLM. The NTLM challenge-response mechanism only provides client authentication. In the NTLM authentication exchange, the server generates an NTLM challenge for the client, the client calculates an NTLM response, and the server validates that response. Using NTLM, users might provide their credentials to a bogus server.
  • Kerberos is an open standard. Microsoft based its Kerberos implementation on the standard defined in Request for Comments (RFC) 4120. RFC 4120 defines version 5 of the Kerberos protocol. Because Kerberos is defined in an open standard, it can provide single sign-on (SSO) between Windows and other OSs supporting an RFC 4120-based Kerberos implementation. You can download RFC 4120 from the Internet Engineering Task Force (IETF) at http://www.ietf.org. NTLM is a proprietary authentication protocol defined by Microsoft. The NTLM protocol is not specified in an open standard document (for example in an IETF RFC).
  • Support for authentication delegation. Thanks to authentication delegation, a service can access remote resources on behalf of a user. What delegation really means is that user A can give rights to an intermediary machine B to authenticate to an application server C as if machine B was user A. This means that application server C will base its authorization decisions on user A's identity rather than on machine B's account. Delegation is also known as authentication forwarding. You can use delegation for authentication in multi-tier applications. An example is database access using a Web-based front-end application. In a multi-tier application, authentication happens on different tiers. In such a setup, if you want to set authorization on the database using the user's identity, you should be capable of using the user's identity for authentication both on the Web server and the database server. This is impossible if you use NTLM for authentication on every link, simply because NTLM doesn't support delegation.
  • Support for smart card logon. Through the Kerberos PKINIT extension, Win2K and later versions include support for the smart card logon security feature. Smart card logon provides much stronger authentication than password logon because it relies on a two-factor authentication. To log on, a user needs to possess a smart card and know its PIN code. Smart card logon also offers other security advantages. For example, it can block Trojan horse attacks that try to grab a user's password from the system memory. The NTLM authentication protocol doesn't support smart card logon.

Table 1: Kerberos-NTLM Feature Comparison

NTLM Kerberos
Underlying Cryptographic Technology Symmetric Cryptography - Basic Kerberos: Symmetric Cryptography
- Kerberos PKINIT (this is the Kerberos subprotocol that supports smart card logon): Symmetric and Asymmetric Cryptography
Trusted Third Party DC - Basic Kerberos: DC with Kerberos Key Distribution Center (KDC) service
- Kerberos PKINIT: DC with KDC service and Windows Enterprise Certification Authority (CA).
Microsoft Supported Platforms Windows 95, Windows 98, Windows ME, NT 4.0, Win2K, XP, Windows 2003/R2, Vista Win2K, XP, Windows 2003/R2, Vista
Features Slower authentication because of pass-through authentication Faster authentication because of unique ticketing system
No mutual authentication Optional mutual authentication
No support for delegation of authentication Support for delegation of authentication
No native protocol support for smart card logon Native protocol support for smart card logon
Proprietary Microsoft authentication protocol Open standard

Set up the lab environment for AD FS in Windows Server 2012 R2

Applies To: Windows Server 2012 R2
This topic outlines the steps to configure a test environment that can be used to complete the walkthroughs in the following walkthrough guides:
Note
We do not recommend that you install the web server and the federation server on the same computer.
To set up this test environment, complete the following steps:
  1. Step 1: Configure the domain controller (DC1)
  2. Step 2: Configure the federation server (ADFS1) by using Device Registration Service
  3. Step 3: Configure the web server (WebServ1) and a sample claims-based application
  4. Step 4: Configure the client computer (Client1)

Step 1: Configure the domain controller (DC1)

For the purposes of this test environment, you can call your root Active Directory domain contoso.com and specify **pass@word1** as the administrator password.
  • Install the AD DS role service and install Active Directory Domain Services (AD DS) to make your computer a domain controller in Windows Server 2012 R2. This action upgrades your AD DS schema as part of the domain controller creation. For more information and step-by-step instructions, see http://technet.microsoft.com/ library/hh472162.aspx.

Create test Active Directory accounts

After your domain controller is functional, you can create a test group and test user accounts in this domain and add the user account to the group account. You use these accounts to complete the walkthroughs in the walkthrough guides that are referenced earlier in this topic.
Create the following accounts:
  • User: Robert Hatley with the following credentials: User name: RobertH and password: **P@ssword**
  • Group: Finance
For information about how to create user and group accounts in Active Directory (AD), see http://technet.microsoft.com/library/cc783323%28v=ws.10%29.aspx.
Add the Robert Hatley account to the Finance group. For information on how to add a user to a group in Active Directory, see http://technet.microsoft.com/library/cc737130%28v=ws.10%29.aspx.

Create a GMSA account

The group Managed Service Account (GMSA) account is required during the Active Directory Federation Services (AD FS) installation and configuration.

To create a GMSA account

  1. Open a Windows PowerShell command window and type:
  1. Add-KdsRootKey –EffectiveTime (Get-Date).AddHours(-10)
    New-ADServiceAccount FsGmsa -DNSHostName adfs1.contoso.com -ServicePrincipalNames http/adfs1.contoso.com


Step 2: Configure the federation server (ADFS1) by using Device Registration Service

To set up another virtual machine, install Windows Server 2012 R2 and connect it to the domain contoso.com. Set up the computer after you have joined it to the domain, and then proceed to install and configure the AD FS role.
For a video, see Active Directory Federation Services How-To Video Series: Installing an AD FS Server Farm.

Install a server SSL certificate

You must install a server Secure Socket Layer (SSL) certificate on the ADFS1 server in the local computer store. The certificate MUST have the following attributes:
  • Subject Name (CN): adfs1.contoso.com
  • Subject Alternative Name (DNS): adfs1.contoso.com
  • Subject Alternative Name (DNS): enterpriseregistration.contoso.com
For more information about setting up SSL certificates, see Configure SSL/TLS on a Web site in the domain with an Enterprise CA.
Active Directory Federation Services How-To Video Series: Updating Certificates.

Install the AD FS server role

To install the Federation Service role service

  1. Log on to the server by using the domain administrator account administrator@contoso.com.
  2. Start Server Manager. To start Server Manager, click Server Manager on the Windows Start screen, or click Server Manager on the Windows taskbar on the Windows desktop. On the Quick Start tab of the Welcome tile on the Dashboard page, click Add roles and features. Alternatively, you can click Add Roles and Features on the Manage menu.
  3. On the Before you begin page, click Next.
  4. On the Select installation type page, click Role-based or feature-based installation, and then click Next.
  5. On the Select destination server page, click Select a server from the server pool, verify that the target computer is selected, and then click Next.
  6. On the Select server roles page, click Active Directory Federation Services, and then click Next.
  7. On the Select features page, click Next.
  8. On the Active Directory Federation Service (AD FS) page, click Next.
  9. After you verify the information on the Confirm installation selections page, select the Restart the destination server automatically if required check box, and then click Install.
  10. On the Installation progress page, verify that everything installed correctly, and then click Close.

Configure the federation server

The next step is to configure the federation server.

To configure the federation server

  1. On the Server Manager Dashboard page, click the Notifications flag, and then click Configure the federation service on the server.
    The Active Directory Federation Service Configuration Wizard opens.
  2. On the Welcome page, select Create the first federation server in a federation server farm, and then click Next.
  3. On the Connect to AD DS page, specify an account with domain administrator rights for the contoso.com Active Directory domain that this computer is joined to, and then click Next.
  4. On the Specify Service Properties page, do the following, and then click Next:
    • Import the SSL certificate that you have obtained earlier. This certificate is the required service authentication certificate. Browse to the location of your SSL certificate.
    • To provide a name for your federation service, type adfs1.contoso.com. This value is the same value that you provided when you enrolled an SSL certificate in Active Directory Certificate Services (AD CS).
    • To provide a display name for your federation service, type Contoso Corporation.
  5. On the Specify Service Account page, select Use an existing domain user account or group Managed Service Account, and then specify the GMSA account fsgmsa that you created when you created the domain controller.
  6. On the Specify Configuration Database page, select Create a database on this server using Windows Internal Database, and then click Next.
  7. On the Review Options page, verify your configuration selections, and then click Next.
  8. On the Pre-requisite Checks page, verify that all prerequisite checks were successfully completed, and then click Configure.
  9. On the Results page, review the results, check whether the configuration has completed successfully, and then click Next steps required for completing your federation service deployment.

Configure Device Registration Service

The next step is to configure Device Registration Service on the ADFS1 server. For a video, see Active Directory Federation Services How-To Video Series: Enabling the Device Registration Service.

To configure Device Registration Service for Windows Server 2012 RTM

  1. Important
    The following step applies to the Windows Server 2012 R2 RTM build.
    Open a Windows PowerShell command window and type:
  Initialize-ADDeviceRegistration
When you are prompted for a service account, type contoso\fsgmsa$.
Now run the Windows PowerShell cmdlet.
  1.   Enable-AdfsDeviceRegistration
    
  2. On the ADFS1 server, in the AD FS Management console, navigate to Authentication Policies. Select Edit Global Primary Authentication. Select the check box next to Enable Device Authentication, and then click OK.

Add Host (A) and Alias (CNAME) Resource Records to DNS

On DC1, you must ensure that the following Domain Name System (DNS) records are created for Device Registration Service.
Entry Type Address
adfs1 Host (A) IP address of the AD FS server
enterpriseregistration Alias (CNAME) adfs1.contoso.com
You can use the following procedure to add a host (A) resource record to corporate DNS name servers for the federation server and Device Registration Service.
Membership in the Administrators group or an equivalent is the minimum requirement to complete this procedure. Review details about using the appropriate accounts and group memberships in the HYPERLINK "http://go.microsoft.com/fwlink/?LinkId=83477" Local and Domain Default Groups (http://go.microsoft.com/fwlink/p/?LinkId=83477).

To add a host (A) and alias (CNAME) resource records to DNS for your federation server

  1. On DC1, from Server Manager, on the Tools menu, click DNS to open the DNS snap-in.
  2. In the console tree, expand DC1, expand Forward Lookup Zones, right-click contoso.com, and then click New Host (A or AAAA).
  3. In Name, type the name you want to use for your AD FS farm. For this walkthrough, type adfs1.
  4. In IP address, type the IP address of the ADFS1 server. Click Add Host.
  5. Right-click contoso.com, and then click New Alias (CNAME).
  6. In the New Resource Record dialog box, type enterpriseregistration in the Alias name box.
  7. In the Fully Qualified Domain Name (FQDN) of the target host box, type adfs1.contoso.com, and then click OK.
    Important
    In a real-world deployment, if your company has multiple user principal name (UPN) suffixes, you must create multiple CNAME records, one for each of those UPN suffixes in DNS.

Step 3: Configure the web server (WebServ1) and a sample claims-based application

Set up a virtual machine (WebServ1) by installing the Windows Server 2012 R2 operating system and connect it to the domain contoso.com. After it is joined to the domain, you can proceed to install and configure the Web Server role.
To complete the walkthroughs that were referenced earlier in this topic, you must have a sample application that is secured by your federation server (ADFS1).
You can download Windows Identity Foundation SDK (http://www.microsoft.com/download/details.aspx?id=4451, which includes a sample claims-based application.
You must complete the following steps to set up a web server with this sample claims-based application.
Note
These steps have been tested on a web server that runs the Windows Server 2012 R2 operating system.
  1. Install the Web Server role and Windows Identity Foundation
  2. Install Windows Identity Foundation SDK
  3. Configure the simple claims app in IIS
  4. Create a relying party trust on your federation server

Install the Web Server role and Windows Identity Foundation

  1. Note
    You must have access to the Windows Server 2012 R2 installation media.
    Log on to WebServ1 by using **administrator@contoso.com** and the password **pass@word1**.
  2. From Server Manager, on the Quick Start tab of the Welcome tile on the Dashboard page, click Add roles and features. Alternatively, you can click Add Roles and Features on the Manage menu.
  3. On the Before you begin page, click Next.
  4. On the Select installation type page, click Role-based or feature-based installation, and then click Next.
  5. On the Select destination server page, click Select a server from the server pool, verify that the target computer is selected, and then click Next.
  6. On the Select server roles page, select the check box next to Web Server (IIS), click Add Features, and then click Next.
  7. On the Select features page, select Windows Identity Foundation 3.5, and then click Next.
  8. On the Web Server Role (IIS) page, click Next.
  9. On the Select role services page, select and expand Application Development. Select ASP.NET 3.5, click Add Features, and then click Next.
  10. On the Confirm installation selections page, click Specify an alternate source path. Enter the path to the Sxs directory that is located in the Windows Server 2012 R2 installation media. For example D:\Sources\Sxs. Click OK, and then click Install.

Install Windows Identity Foundation SDK

  1. Run WindowsIdentityFoundation-SDK-3.5.msi to install Windows Identity Foundation SDK 3.5 (http://www.microsoft.com/download/details.aspx?id=4451). Choose all of the default options.

Configure the simple claims app in IIS

  1. Install a valid SSL certificate in the computer certificate store. The certificate should contain the name of your web server, webserv1.contoso.com.
  2. Copy the contents of C:\Program Files (x86)\Windows Identity Foundation SDK\v3.5\Samples\Quick Start\Web Application\PassiveRedirectBasedClaimsAwareWebApp to C:\Inetpub\Claimapp.
  3. Edit the Default.aspx.cs file so that no claim filtering takes place. This step is performed to ensure that the sample application displays all the claims that are issued by the federation server. Do the following:
    1. Open Default.aspx.cs in a text editor.
    2. Search the file for the second instance of ExpectedClaims.
    3. Comment out the entire IF statement and its braces. Indicate comments by typing “//” (without the quotes) at the beginning of a line.
    4. Your FOREACH statement should now look like this code example.
    1. Foreach (claim claim in claimsIdentity.Claims)
      {
         //Before showing the claims validate that this is an expected claim
         //If it is not in the expected claims list then don’t show it
         //if (ExpectedClaims.Contains( claim.ClaimType ) )
         // {
            writeClaim( claim, table );
         //}
      }
      
    2. Save and close Default.aspx.cs.
    3. Open web.config in a text editor.
    4. Remove the entire section. Remove everything starting from including and up to and including .
    5. Save and close web.config.
  1. Configure IIS Manager
    1. Open Internet Information Services (IIS) Manager.
    2. Go to Application Pools, right-click DefaultAppPool to select Advanced Settings. Set Load User Profile to True, and then click OK.
    3. Right-click DefaultAppPool to select Basic Settings. Change the .NET CLR Version to .NET CLR Version v2.0.50727.
    4. Right-click Default Web Site to select Edit Bindings.
    5. Add an HTTPS binding to port 443 with the SSL certificate that you have installed.
    6. Right-click Default Web Site to select Add Application.
    7. Set the alias to claimapp and the physical path to c:\inetpub\claimapp.
  2. To configure claimapp to work with your federation server, do the following:
    1. Run FedUtil.exe, which is located in C:\Program Files (x86)\Windows Identity Foundation SDK\v3.5.
    2. Set the application configuration location to C:\inetput\claimapp\web.config and set the application URI to the URL for your site, https://webserv1.contoso.com /claimapp/. Click Next.
    3. Select Use an existing STS and browse to your AD FS server's metadata URL https://adfs1.contoso.com/federationmetadata/2007-06/federationmetadata.xml. Click Next.
    4. Select Disable certificate chain validation, and then click Next.
    5. Select No encryption, and then click Next. On the Offered claims page, click Next.
    6. Select the check box next to Schedule a task to perform daily WS-Federation metadata updates. Click Finish.
    7. Your sample application is now configured. If you test the application URL https://webserv1.contoso.com/claimapp, it should redirect you to your federation server. The federation server should display an error page because you have not yet configured the relying party trust. In other words, you have not secured this test application by AD FS.
You must now secure your sample application that runs on your web server with AD FS. You can do this by adding a relying party trust on your federation server (ADFS1). For a video, see Active Directory Federation Services How-To Video Series: Add a Relying Party Trust.

Create a relying party trust on your federation server

  1. On you federation server (ADFS1), in the AD FS Management console, navigate to Relying Party Trusts, and then click Add Relying Party Trust.
  2. On the Select Data Source page, select Import data about the relying party published online or on a local network, enter the metadata URL for claimapp, and then click Next. Running FedUtil.exe created a metadata .xml file. It is located at https://webserv1.contoso.com/claimapp/federationmetadata/2007-06/federationmetadata.xml.
  3. On the Specify Display Name page, specify the display name for your relying party trust, claimapp, and then click Next.
  4. On the Configure Multi-factor Authentication Now? page, select I do not want to specify multi-factor authentication setting for this relying party trust at this time, and then click Next.
  5. On the Choose Issuance Authorization Rules page, select Permit all users to access this relying party, and then click Next.
  6. On the Ready to Add Trust page, click Next.
  7. On the Edit Claim Rules dialog box, click Add Rule.
  8. On the Choose Rule Type page, select Send Claims Using a Custom Rule, and then click Next.
  9. On the Configure Claim Rule page, in the Claim rule name box, type All Claims. In the Custom rule box, type the following claim rule.
  1. c:[ ]
    => issue(claim = c);
    
  2. Click Finish, and then click OK.

Step 4: Configure the client computer (Client1)

Set up another virtual machine and install Windows 8.1. This virtual machine must be on the same virtual network as the other machines. This machine should NOT be joined to the Contoso domain.
The client MUST trust the SSL certificate that is used for the federation server (ADFS1), which you set up in Step 2: Configure the federation server (ADFS1) by using Device Registration Service. It must also be able to validate certificate revocation information for the certificate.

You also must set up and use a Microsoft account to log on to Client1.

Walkthrough Guide: Connect to Applications and Services from Anywhere with Web Application Proxy

Applies To: Windows Server 2012 R2
This content is relevant for the on-premises version of Web Application Proxy. To enable secure access to on-premises applications over the cloud, see the Azure AD Application Proxy content.
This walkthrough provides instructions for connecting to applications and services from anywhere with Web Application Proxy. For more information about connecting to applications and services from anywhere with Web Application Proxy and Windows Server® 2012 R2, see Connect to Applications and Services from Anywhere with Web Application Proxy and the video for Installing the Web Application Proxy.
Before you perform this walkthrough, make sure you have completed the lab setup guide, see Set up the lab environment for AD FS in Windows Server 2012 R2. Also make sure you have completed the following planning steps that are required in order to deploy Web Application Proxy and publish applications through it using Active Directory Federation Services (AD FS) for authentication and authorization, including workplace join, multifactor authentication (MFA), and multifactor access control.
  • Plan the Web Application Proxy infrastructure—Before you deploy Web Application Proxy, you must plan the infrastructure. For this walkthrough, this includes:
    • The Web Application Proxy server should be located between the corporate network and the Internet; in this walkthrough, this is achieved by configuring two network adapters on the Web Application Proxy server.
    • For clients to reach a published web application they must be able to resolve the external address of the application that is published by Web Application Proxy. In this walkthrough, this is achieved through the hosts file on the client.
  • Plan the Web Application Proxy server
    • It is recommended to join the Web Application Proxy server to the AD DS domain. Joining the Web Application Proxy server to the domain allows you to expand this walkthrough to demonstrate publishing applications that use Integrated Windows authentication.
    • Make sure that the server time of the Web Application Proxy and AD FS servers are synchronized.
    • To install the Web Application Proxy role service, you must have local administrator permissions on the server.
    • To configure the Web Application Proxy server to connect to AD FS, you are required to enter the credentials of the local administrator on the AD FS server.
    • Make sure that there is a certificate in the Personal certificates store on the Web Application Proxy server that covers the federation service name. This certificate is required for AD FS proxy functionality.
      To locate the federation service name value, open the AD FS Management console, click Service, in the Actions pane, click Edit Federation Service Properties, and then find the value in the Federation Service name text box.
    • Make sure that there is a certificate in the Personal certificates store on the Web Application Proxy server that covers the external address of the sample web application; that is, the address that you will configure when you publish the application through Web Application Proxy. In this walkthrough, you can use a self-signed certificate, or a certificate from an Enterprise certification authority (CA).
    Note
    In a production environment, it is recommended to use certificates from a public CA on your Web Application Proxy server.
Task Description
Step 1: Attempt to access the web application from an Internet client Configure an edge server and demonstrate that before configuring Web Application Proxy and publishing the application, the web application server is protected from the Internet, and clients are unable to access the application.
Step 2: Configure the Web Application Proxy server and publish the application Configure the edge server as a Web Application Proxy server, publish the web application, and demonstrate that with the default AD FS authentication scheme, a client device can access the published application from the Internet.
Step 3: Configure and test accessing a website using Integrated Windows authentication Configure an additional website on WebServ1 to use Integrated Windows authentication, configure Kerberos constrained delegation in the lab, publish the application through Web Application Proxy, and demonstrate accessing this application from the Internet.
Step 4: Demonstrate accessing an application using Workplace Join, MFA, and multifactor access control Configure Workplace Join, multifactor authentication (MFA), and multifactor access control, and demonstrate how these additional authentication factors change the user experience when client devices attempt to access the published web application.

Step 1: Attempt to access the web application from an Internet client

In this step, you will configure an edge server and attempt to access the sample application. This step does not install the Web Application Proxy role service on the server. After configuring the edge server you will modify the hosts file on the client computer and attempt to connect to the sample web application through the edge server.

To install the edge server

  1. Create a Windows Server 2012 R2 server with two network adapters, one connected to the corporate network, one connected to the simulated Internet.
  2. Configure the static IP addresses on the server. For example, the network adapter on the corporate network should have an IP address of 10.0.0.2, the network adapter on the simulated Internet should have an IP address of 131.107.0.2.
  3. Join the server to the AD DS domain.

To access the application

  1. In your lab environment, connect the client computer to the simulated Internet network and assign a static IP address; for example 131.107.0.10.
  2. On the client computer, open Notepad as the administrator.
  3. In the Notepad window, open the hosts file located at %windir%\System32\Drivers\etc.
  4. Add two new lines to the file; for example:
  1. 131.107.0.2       webserv1.contoso.com
    131.107.0.2       adfs1.contoso.com
    131.107.0.2       enterpriseregistration.contoso.com
    
    • The first line contains the IP address of the Internet adapter of the edge server and the external address of the sample application that you will configure when you publish the application through Web Application Proxy.
    • The second line contains the same IP address and the address of the federation server.
    • The third line contains the same IP address and the address required for Workplace Join.
  2. Open an Internet explorer window and go to the sample web application; for example, https://webserv1.contoso.com/claimapp/.
    The edge server is not providing proxy or publishing functionality; therefore, you will not be able to access the application.

Step 2: Configure the Web Application Proxy server and publish the application

In this step you will:
  • Configure the Web Application Proxy server.
  • Connect the Web Application Proxy server to the AD FS server using the Web Application Proxy Configuration Wizard.
  • Publish the sample application.
  • Attempt to connect to the sample application using the default AD FS authentication scheme.
Before you can publish the application, make sure you have done the following:
  • Create a relying party trust for the sample application in the AD FS Management console. If you did not do this when setting up your environment, see Create a relying party trust on your federation server.
  • Verify that a certificate on the Web Application Proxy server is suitable for the sample application you want to publish.
Membership in the local Administrators group, or equivalent, is the minimum required to complete this procedure.

To install the Web Application Proxy role service

  1. On the edge server, open Server Manager. To do this, click Server Manager on the Start screen, or Server Manager in the taskbar on the desktop.
  2. In the Quick Start tab of the Welcome tile on the Dashboard page, click Add roles and features. Alternatively, you can click Add Roles and Features on the Manage menu.
  3. In the Add Roles and Features Wizard, click Next three times to get to the server role selection screen.
  4. On the Select server roles dialog, select Remote Access, and then click Next.
  5. Click Next twice.
  6. On the Select role services dialog, select Web Application Proxy, click Add Features, and then click Next.
  7. On the Confirm installation selections dialog, click Install.
  8. On the Installation progress dialog, verify that the installation was successful, and then click Close.
Windows PowerShell equivalent commands
The following Windows PowerShell cmdlet or cmdlets perform the same function as the preceding procedure. Enter each cmdlet on a single line, even though they may appear word-wrapped across several lines here because of formatting constraints.
Install-WindowsFeature Web-Application-Proxy -IncludeManagementTools

To configure Web Application Proxy

  1. On the Web Application Proxy server, open the Remote Access Management console: On the Start screen, click the Apps arrow. On the Apps screen, type RAMgmtUI.exe, and then press ENTER. If the User Account Control dialog box appears, confirm that the action it displays is what you want, and then click Yes.
  2. In the Remote Access Management console, in the navigation pane, click Web Application Proxy.
  3. In the middle pane, click Run the Web Application Proxy Configuration Wizard.
  4. In the Web Application Proxy Configuration Wizard, on the Welcome dialog, click Next.
  5. On the Federation Server dialog, do the following, and then click Next:
    • In the Federation service name box, enter the fully qualified domain name (FQDN) of the federation service; for example, adfs1.contoso.com.
      To locate this value, open the AD FS Management console, click Service, in the Actions pane, click Edit Federation Service Properties, and then find the value in the Federation Service name text box.
    • In the User name and Password boxes, enter the credentials of a local administrator account on the AD FS servers.
  6. On the AD FS Proxy Certificate dialog, in the list of certificates currently installed on the Web Application Proxy server, select a certificate to be used by Web Application Proxy for AD FS proxy functionality, and then click Next.
  7. On the Confirmation dialog, review the settings. If required, you can copy the PowerShell cmdlet to automate additional installations. Click Configure.
  8. On the Results dialog, verify that the configuration was successful, and then click Close.
Windows PowerShell equivalent commands
The following Windows PowerShell cmdlet or cmdlets perform the same function as the preceding procedure. Enter each cmdlet on a single line, even though they may appear word-wrapped across several lines here because of formatting constraints.
The following command will prompt you to enter credentials of a local administrator account on the AD FS servers.
Install-WebApplicationProxy –CertificateThumprint '1a2b3c4d5e6f1a2b3c4d5e6f1a2b3c4d5e6f1a2b' -FederationServiceName adfs1.contoso.com

To publish the sample claims-based application

  1. On the Web Application Proxy server, in the Remote Access Management console, in the Navigation pane, click Web Application Proxy, and then in the Tasks pane, click Publish.
  2. On the Publish New Application Wizard, on the Welcome page, click Next.
  3. On the Preauthentication page, click Active Directory Federation Services (AD FS), and then click Next.
  4. On the Relying Party page, in the list of relying parties select the relying party for the sample application, and then click Next.
  5. On the Publishing Settings page, do the following, and then click Next:
    • In the Name box, enter a friendly name for the application.
    • In the External URL box, enter the external URL for this application; for example, https://webserv1.contoso.com/claimapp/.
    • In the External certificate list, select a certificate whose subject name covers the external URL.
    • In the Backend server URL box, enter the URL of the backend server. Note that this value is automatically entered when you enter the external URL.
  6. On the Confirmation page, review the settings, and then click Publish. You can copy the PowerShell command set up additional published applications.
  7. On the Results page, make sure that application published successfully, and then click Close.
    Publishing the application may take a couple of minutes.
Windows PowerShell equivalent commands
The following Windows PowerShell cmdlet or cmdlets perform the same function as the preceding procedure. Enter each cmdlet on a single line, even though they may appear word-wrapped across several lines here because of formatting constraints.
Add-WebApplicationProxyApplication
    -BackendServerURL 'https://webserv1.contoso.com/claimapp/'
    -ExternalCertificateThumbprint '1a2b3c4d5e6f1a2b3c4d5e6f1a2b3c4d5e6f1a2b'
    -ExternalURL 'https://webserv1.contoso.com/claimapp/'
    -Name 'Claims App'
    -ExternalPreAuthentication ADFS
    -ADFSRelyingPartyName 'App_Relying_Party'

To access the application

  1. On the client computer, open an Internet explorer window and go to the sample web application; for example, https://webserv1.contoso.com/claimapp/.
  2. On the sign in page, enter the credentials of the test user that you created when you set up the environment.
  3. The application appears in the web browser.

Step 3: Configure and test accessing a website using Integrated Windows authentication

In this step you will configure a website on WebServ1 to use Integrated Windows authentication. You can publish this website as an additional application through Web Application Proxy to demonstrate how Web Application Proxy uses Kerberos constrained delegation to authenticate users to non-claims-based applications.
Important
You must join the Web Application Proxy server to the Active Directory® Domain Services domain before you can publish applications that use Integrated Windows authentication.

Install Windows Authentication on WebServ1

When you install the Web Server (IIS) role, by default, it does not install the option to use Integrated Windows authentication (referred to by IIS as Windows Authentication). This procedure installs Windows Authentication.

To install Windows Authentication on WebServ1

  1. On the edge server, open Server Manager. To do this, click Server Manager on the Start screen, or Server Manager in the taskbar on the desktop.
  2. In the Quick Start tab of the Welcome tile on the Dashboard page, click Add roles and features. Alternatively, you can click Add Roles and Features on the Manage menu.
  3. In the Add Roles and Features Wizard, click Next three times to get to the server role selection screen.
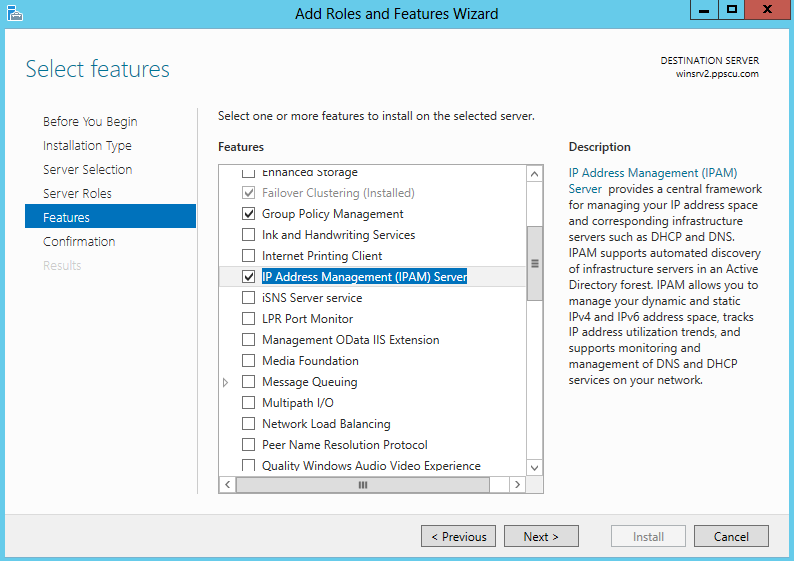
  4. On the Select server roles dialog, expand Web Server (IIS), expand Web Server, expand Security, select Windows Authentication, and then click Next.
  5. On the Select features dialog, click Next.
  6. On the Confirm installation selections dialog, click Install.
  7. On the Installation progress dialog, verify that the installation was successful, and then click Close.

Create a new website using IIS

The WebServ1 server already hosts a website that uses claims-based authentication. This procedure creates a new website that uses Integrated Windows authentication.

To create a new website

  1. Open an Explorer window and go to C:\inetpub\.
  2. Create a new folder called NonClaims.
  3. Open C:\inetpub\wwwroot\ and copy the contents to the new folder C:\inetpub\NonClaims\.
    Important
    Do not copy the web.config file.
  4. On the Start screen, click the Apps arrow. On the Apps screen, type inetmgr.exe, and then press ENTER.
  5. In the IIS console, in the Connections pane, expand WebServ1, expand Sites, right-click Default Web Site, and then click Add Virtual Directory.
  6. On the Add Virtual Directory dialog box, in the Alias box, type NonClaims.
  7. Next to the Physical Path box, type C:\inetpub\NonClaims, and then click OK.
  8. In the Connections pane, click the NonClaims virtual directory.
  9. In the middle pane, in the IIS section, double-click Authentication.
  10. In the Authentication pane, right-click Anonymous Authentication, and then click Disable. Right-click Windows Authentication, and then click Enable.

Create a non-claims-aware relying party trust

To publish the application through Web Application Proxy, you must first create a non-claims-aware relying party trust on the AD FS server.

To create a non-claims-aware relying party trust

  1. On the AD FS server, in the AD FS Management console, in the left pane, click Trust Relationships.
  2. In the Actions pane, click Add Non-Claims-Aware Relying Party Trust.
  3. In the Add Non-Claims-Aware Relying Party Trust Wizard, on the Welcome page, click Start.
  4. On the Specify Display Name page, in Display name, enter a name for this trust; for example, Non-Claims Application, and then click Next.
  5. On the Configure Identifiers page, in Non-claims-aware relying party trust identifier, enter an arbitrary URL as an identifier for this trust, click Add, and then click Next.
  6. Click Next twice.
  7. On the Finish page, click Close.
    The Edit Claim Rules for dialog box opens.
  8. On the Edit Claim Rules for , click Add Rule.
  9. In the Add Issuance Authorization Claim Rule Wizard, on the Select Rule Template page, in the Claim rule template list, select Permit All Users, and then click Next.
  10. On the Configure Rule page, click Finish, and then on the Edit Claim Rules for dialog box, click OK.

Configure Kerberos constrained delegation

To allow users to access applications that use Integrated Windows authentication, the Web Application Proxy server must be able to provide impersonation for users to the published application.
Tip
This procedure assumes that the Web Application Proxy server is named EDGE1.

To configure Kerberos constrained delegation

  1. On the domain controller, open Server Manager. To do this, click Server Manager on the Start screen, or Server Manager in the taskbar on the desktop.
  2. Click Tools, and then click ADSI Edit.
  3. On the Action menu, click Connect To, and then on the Connection Settings dialog box, accept the default settings to connect to the default naming context, and then click OK.
  4. In the left pane, expand Default naming context, expand DC=contoso,DC=com, expand CN=Computers, right-click CN=EDGE1, and then click Properties.
  5. On the CN=EDGE1 Properties dialog box, on the Attribute Editor tab, in the Attributes list, select servicePrincipalName, and then click Edit.
  6. On the Multi-valued String Editor dialog box, in Value to add, enter HTTP/EDGE1.contoso.com and click Add. Then enter HTTP/EDGE1 and click Add.
    The Values list now contains two new entries; for example, HTTP/EDGE1.contoso.com and HTTP/EDGE1.
  7. On the Multi-valued String Editor dialog box, click OK.
  8. On the CN=EDGE1 Properties dialog box, click OK.
  9. In Server Manager, click Tools, and then click Active Directory Users and Computers.
  10. In the navigation pane, under contoso.com, click Computers. In the details pane, right-click the edge server, and then click Properties.
  11. On the EDGE1 Properties dialog box, on the Delegation tab, click Trust this computer for delegation to specified services only, and then click Use any authentication protocol.
  12. Click Add, and on the Add Services dialog box, click Users or Computers.
  13. On the Select Users or Computers dialog box, in Enter the object names to select, enter the name of the web server; for example, WebServ1, and then click OK.
  14. On the Add Services dialog box, in the Available services list, select the http service type, and then click OK.
  15. On the EDGE1 Properties dialog box, click OK.

Test accessing the application internally

To make sure that the application is working correctly, you should test accessing the application from the Web Application Proxy server before continuing.

To access the application internally

  1. On the Web Application Proxy server, make sure that IE Enhanced Security Configuration is turned off.
  2. Open an Internet explorer window and go to the non-claims-based web application; for example, https://webserv1.contoso.com/nonclaims/.
  3. On the sign in page, enter the credentials of the test user that you created when you set up the environment.
    The default IIS website appears.

Publish the application

You must publish the application through Web Application Proxy to make it available to external users.

To publish the non-claims-based application

  1. On the Edge server, open the Remote Access Management console: On the Start screen, click the Apps arrow. On the Apps screen, type RAMgmtUI.exe, and then press ENTER.
  2. In the navigation pane, under Configuration, click Web Application Proxy.
  3. In the Tasks pane, click Publish.
  4. In the Publish New Application Wizard, on the Welcome page, click Next.
  5. On the Preauthentication page, make sure that Active Directory Federation Services (AD FS) is selected, and then click Next.
  6. On the Relying Party page, select the non-claims application relying party, and then click Next.
  7. On the Publishing Settings page, do the following, and then click Next:
    • In the Name box, enter a friendly name for the application to identify it in the list of published applications; for example, Non-Claims Application.
    • In the External URL box, enter the external URL for this application; for example, https://WebServ1.contoso.com/NonClaims/.
    • In the External certificate list, select a certificate whose subject covers the external address.
    • In the Backend server URL box, the value is entered automatically and is the same as the external URL.
    • In the Backend server SPN box, enter the service principal name for this application; for example, HTTP/WEBSERV1.contoso.com.
  8. On the Confirmation page, click Publish.
  9. On the Results page, click Close.

Test accessing the application

After publishing the application through Web Application Proxy, you can test accessing the application from the simulated Internet.

To test accessing the application

  1. Connect the client computer to the simulated Internet network and assign a static IP address; for example 131.107.0.10.
  2. Open an Internet explorer window and go to the non-claims-based web application; for example, https://webserv1.contoso.com/nonclaims/.
  3. On the sign in page, enter the credentials of the test user that you created when you set up the environment.
    The default IIS website appears.

Step 4: Demonstrate accessing an application using Workplace Join, MFA, and multifactor access control

In this step you will join the client device to the workplace, and configure AD FS to enforce MFA, and multifactor access control when publishing the sample application through Web Application Proxy, and demonstrate that MFA and multifactor access control are working.
Important
For Workplace Join to succeed, the client computer (Client1) must trust the SSL certificate that was used to configure AD FS in Step 2: Configure the federation server (ADFS1) by using Device Registration Service. It must also be able to validate revocation information for the certificate. If you have any issues with Workplace Join, you can view the event log on Client1. To see the event log, open Event Viewer, expand Applications and Services Logs, expand Microsoft , expand Windows and click Workplace Join.

To Workplace Join your device and access the application

  1. On the client computer, on the Start screen, open the Charms bar and then select the Settings charm. Click Change PC Settings.
  2. On the PC Settings page, click Network, and then click Workplace.
  3. In the Enter your UserID to get workplace access or turn on device management box, type **RobertH@contoso.com** and then click Join.
  4. When prompted for credentials, type **roberth@contoso.com**, and enter the password. Click OK.
  5. You should now see the message: This device has joined your workplace network.
  6. Open an Internet explorer window and go to the sample web application; for example, https://webserv1.contoso.com/claimapp/.
  7. On the sign in page, enter the credentials of the test user (RobertH) that you created when you set up the environment.
  8. The application appears in the web browser showing the claims in your security token. Notice that the token contains both user and device claims.

To configure authentication options and attempt to access the application

  1. Configure advanced authentication options such as MFA and user certificate as described in Step 3: Configure MFA on your federation server.
  2. In your lab environment, connect the client computer to the simulated Internet network and assign a static IP address; for example 131.107.0.10.
  3. Open an Internet explorer window and go to the sample web application; for example, https://webserv1.contoso.com/claimapp/.
  4. On the sign in page, enter the credentials of the test user that you created when you set up the environment.
    At this point, because of the MFA policy that you configured, the user will be prompted to undergo additional authentication.
    This demonstrates that the additional authentication factor that you configured is now required to access the application.
Tip
In this walkthrough, it is necessary to disable MFA before configuring multifactor access control.

To configure multifactor access control and attempt to access the application


  1. Configure multifactor access control as described in Step 3: Configure conditional access control policy based on user data.
  2. Disable MFA as follows:
    1. On the AD FS server, in the AD FS Management console, navigate to Authentication Policies/Per Relying Party Trust, and select the relying party trust that represents your sample application.
    2. In the Actions pane, click Edit Custom Multi-factor Authentication.
    3. In the Edit Relying Party Trust for dialog box, in the Users/Groups list, select the test group that you previously added, click Remove, and then click OK.
  3. On the client computer, open an Internet explorer window and go to the sample web application; for example, https://webserv1.contoso.com/claimapp/.
  4. On the sign in page, enter the credentials of the test user that you created when you set up the environment.
    At this point, because of the access control policy that you set up in the previous steps, an ‘access denied’ message is displayed for this user, demonstrating that the access control rule is in effect.

Sunday, December 23, 2018

7 Simple Steps to Configure IPAM in Windows Server 2012

IP address management (IPAM) is a new feature introduced in Windows Server 2012 that allows you to configure, manage and have a general overview of the network’s IP addresses and ranges. With IPAM, you can search for desired IP addresses and ranges, manage and configure DHCP scopes and DNS entries, view the status of your IP addresses blocks and search for free IP addresses. Large enterprises usually deploy one or multiple IPAM servers because, as the network evolves, the complexity of its IPs and subnets increases significantly.
An IPAM server allows you to track all IP address changes that occur within the network. I’ve previously used IPAM software from other vendors, but never from Microsoft. With the release of Windows Server 2012, System Administrators were able to track and manage all network devices from an Active Directory domain. Note that this is a requirement of IPAM, you cannot manage any servers that do not belong from the same Active Directory forest. Because this is a Microsoft technology, you cannot use this feature with non-Windows Operating Systems or network devices. IPAM allows you to manage both DNS and DHCP servers and you can now easily change DHCP options from one or multiple scopes using the centralized IPAM console. You can also track dynamically assigned addresses but also static ones. Both public and private IP addresses can be tracked with IPAM.

In this article I will show you how to install and configure IPAM and we’ll also cover some of its basic features. Note that I will be using a Virtual Machine hosted in my VMware testing environment running Windows Server 2012. My VM is also a member of an Active Directory forest so make sure to cover this aspect as well.

Step 1 – Installation

IPAM can be installed in two ways: using Windows Powershell or by accessing the Roles and Features section from Server Manager Console:
add roles and features wizard
With Windows PowerShell this operation can be performed much faster by executing the following command:
Install-WindowsFeature IPAM –IncludeManagementTools

Step 2 – Provisioning

Once the installation has been successfully completed, open the Server Manger Console and navigate to the IPAM section. Here you will discover all available IPAM server tasks:
ipam server tasks
Select the second option, Provision the IPAM, to start the IPAM configuration wizard. In this section is where the IPAM database, security groups, tasks and folders are created.

Step 3 – Provisioning Method

You must configure how the IPAM server interacts with network servers, there are two options available: manually or by using GPOs. Simply put, by selecting the first option, an administrator would have to configure security groups, firewall rules and network shares manually on each machine. This method is really not recommend since it adds a lot of extra configurations and increases the overall complexity of the IPAM deployment.
The second option is much easier to implement since it uses Group Policy Objects to configure all IPAM managed servers. Unless you simply cannot you use the second option, you should always use GPOs to configure servers managed by IPAM. Note that you have to specify a prefix that will be set to the IPAM GPOs:
ipam provisioning methods
Once the wizard has been successfully completed, three Group Policy Objects will be created: one for DNS servers, one for DHCP servers and one for Domain Controllers.

Step 4 – Configure Server Discovery

Select the third task from the IPAM console to configure server discovery. This is where we specify what servers should be discovered by our IPAM machine. You will need to select and add domains to discover. By default, all three types of servers are selected: DNS, DHCP and Domain Controllers. You can change the discovery options by selecting only desired types of servers:

configure server discovery

Step 5 – Start Discovery

Once this section has been covered, select the 4th task to start the server discovery procedure:
start server discovery task
If you receive an error stating that discovered machines were blocked, you need to execute the following Powershell command to create the GPOs that later will be assigned to your machines:

Invoke-IpamGpoProvisioning -Domain ppscu.com -GpoPrefixName IPAMPPSCU
invoke ipamgpoprovisioning

Step 6 – Verify GPOs

You can now verify the GPOs in the Group Policy Management Console. Connect to the blocked machine and execute gpupdate /force to propagate the newly created GPOs.
For each machine you will have to change its manageability status to managed, you can do so if you right click on the blocked machine and select edit server:

add or edit server for ipam
The machine should change its IPAM Access status to Unblocked.

Step 7 – Import Data

Now that the server has been added to IPAM, you can retrieve and import its data to the IPAM server if you right click on the machine and select Retrieve All Server Data. You can also execute the 6th available task from the IPAM console to retrieve data from managed servers:
ipam server inventory


That’s about it for the configuration part of an IPAM server. We’ve covered the most important steps that you need to take in order to successfully deploy IPAM within your enterprise. If you have followed these steps precisely, you should have installed and configured an IPAM machine with at least one discovered host. Note that same principles are applied when used in a large organization with multiple hosts.