Thursday, February 22, 2018

Fix Outlook 2013 and 2010 “Loading Profile” Problems

Fix It – #1

You can try to uninstall Office 2013 completely and re-install it. But this will take some time. You can also do a repair install from the Programs and Features section in the Control Panel.

Fix It – #2

You can also repair the .pst or .ost file using the Outlook repair tool.  ScanPST is a tool to scan and repair corrupted pst file. This file is located in different locations for different versions of Microsoft Outlook.
SCANPST IN OUTLOOK 2010 32-Bit
Windows 32-Bit   C:Program FilesMicrosoft OfficeOffice14
Windows 64-Bit   C:Program Files (x86)Microsoft OfficeOffice14
SCANPST IN OUTLOOK 2010 64-Bit
Windows 64-Bit   C:Program FilesMicrosoft OfficeOffice14
SCANPST IN OUTLOOK 2013 32-Bit
Windows 32-Bit   C:Program FilesMicrosoft OfficeOffice15
Windows 64-Bit    C:Program Files (x86)Microsoft OfficeOffice15
SCANPST IN OUTLOOK 2013 64-Bit
Windows 64-Bit  C:Program FilesMicrosoft OfficeOffice15
Windows 32-Bit    C:Program FilesMicrosoft OfficeOffice15
Windows 64-Bit  C:Program Files (x86)Microsoft OfficeOffice15
Run that file with elevated privileges and find the location of the .pst or .ost file. These files are nothing but related to your email accounts, in Outlook 2013. The most noteworthy location will be like this –
C:\Users\palla\AppData\Local\MicrosoftOutlook
Click on the Start button. The tool will check for file consistency and check for any repairs in the .ost file in Outlook 2013. Once the repair complete dialog box is displayed, you can click on OK and try re-opening Outlook again. 
This sometimes mostly solves the problem.

Fix It – #3

Another solution is to disable hardware acceleration.
Fix : 
  1. Run regedit
  2. Browse to HKEY_CURRENT_USERSoftwareMicrosoftOffice15.0Common
  3. Create a New Key and name it “Graphics”
  4. Select Graphics, right-click on the right panel and create a New DWORD (32-bit) Value and name it DisableHardwareAcceleration.
  5. Enter Value data as 1

Fix It – #4

Another simple solution is to check the system drive for errors using the following command.  Solutions
Method : – simple solution on Windows 8:  Win + X  -> Command Prompt (Admin) -> chkdsk c: /f -> Answer (Y) -> Restart Windows.

Fix It – #5

Another simple method is to open Outlook in safe mode and disable the add-ins.
Method :
Let us open Outlook in safe mode and check. Follow the steps:
1. Press the Windows + R key on the keyboard.
2. Type Outlook /safe (leave a space after Outlook) -> Click OK.
If you are able to open Outlook 2013 or 2016, then disable the add-ins and check if it helps. Follow the steps disable the add-ins:
1. Click on File -> Go to Options.
2. Click on Add-ins -> select COM Add-ins under Manage ->Click Go
3.Select the add-ins to disable -> Click OK.

Fix It – #6

Sometimes a third-party VPN like “Express VPN” can interfere with the normal startup of Outlook. So either uninstalling the VPN or disabling it from running at start-up can solve the issue.

Fix It – #7

In corporate environment, you will not be given the access to uninstall VPN software. In such cases, if you can open Outlook in safe and disable the add-ins of your VPN software, then this can solve the issue. You can run the following two commands in the Run box.
outlook.exe /resetnavpane  or  outlook.exe /resetfolders
If everything works fine after the first command, then you are good to go. Otherwise, try the second command. But Outlook may take a bit of time, after execution of the 2nd command.

Fix It – #8

In Windows 8 and 7, there are some services which can interfere with the proper functioning of Outlook 2013 and 2016. One such service is the “Desktop Window Manager Session Manager”. You can stop this service and set the status to “Disabled“. Now Re-start and Outlook should open fine.

Fix It – #9

Lync is one Office product which can have compatibility problems with Outlook. So if you have it running parallel, then it’s best to kill the task using the Task Manager.  Now Outlook 2013 should open without problems.

Fix It – #10

The common cause for Outlook Profile not loading is because its data files are being accessed by other applications. If the data file are being locked or accessed by third-party applications like Google Calendar, Microsoft Communicator etc, this can happen. There are a few solutions in this case.
  1. You can stop the sync process of other applications which are trying to access these data files.
  2. You can disable your anti-virus temporarily and check if the problem is resolved.
  3. You can stop the Windows search indexing service and see if Outlook loads fine.
  4. You can kill the outlook.exe process and then restart Outlook.

Fix It – #11

Another common problem of Outlook taking forever to load in 2016 version could be due to compatibility problems. For example, if you are using Windows 7 SP1, then you can check the properties of Outlook 2016 shortcut. Now under “Compatibility” tab,  uncheck the box next to ‘Run this program in compatibility mode for: Windows 7 Service Pack 1‘.
If it is Windows 10, the short-cut would be available in the following path.
C:\ProgramData\Microsoft\Windows\Start Menu\Programs
You can then run the “Troubleshoot Compatibility” tool which can fix this issue.

Fix It – #12

In Windows 10 and Outlook 2016, there can be problems related to Networking things. So while loading up Outlook if you can cut-off your Wi-Fi and other network interfaces, your Outlook should load fine. The general problem may be due to Telemetry and TCP related stuff.
These are some of the solutions I have tried to fix my Outlook 2013 loading profile problem.  You can disable the add-ins, which will reduce the delay in opening Outlook.
Saturday, February 17, 2018

Migrate Cluster Roles to Windows Server 2012 R2

Applies To: Windows Server 2012 R2
This guide provides step-by-step instructions for migrating clustered services and applications to a failover cluster running Windows Server 2012 R2 by using the Copy Cluster Roles Wizard. Not all clustered services and applications can be migrated using this method. This guide describes supported migration paths and provides instructions for migrating between two multi-node clusters or performing an in-place migration with only two servers. Instructions for migrating a highly available virtual machine to a new failover cluster, and for updating mount points after a clustered service migration, also are provided.

Operating system requirements for clustered roles and feature migrations

The Copy Cluster Roles Wizard supports migration to a cluster running Windows Server 2012 R2 from a cluster running any of the following operating systems:
  • Windows Server 2008 R2 with Service Pack 1 (SP1)
  • Windows Server 2012
  • Windows Server 2012 R2
Migrations are supported between different editions of the operating system (for example, from Windows Server Enterprise to Windows Server Datacenter), between x86 and x64 processor architectures, and from a cluster running Windows Server Core or the Microsoft Hyper-V Server R2 operating system to a cluster running a full version of Windows Server.
The following migrations scenarios are not supported:
Important
Before you perform a migration, you should install the latest updates for the operating systems on both the old failover cluster and the new failover cluster.

Target audience

This migration guide is designed for cluster administrators who want to migrate their existing clustered roles, on a failover cluster running an earlier version of Windows Server, to a Windows Server 2012 R2 failover cluster. The focus of the guide is the steps required to successfully migrate the clustered roles and resources from one cluster to another by using the Copy Cluster Roles Wizard in Failover Cluster Manager.
General knowledge of how to create a failover cluster, configure storage and networking, and deploy and manage the clustered roles and features is assumed.
It is also assumed that customers who will use the Copy Cluster Roles Wizard to migrate highly available virtual machines have a basic knowledge of how to create, configure, and manage highly available Hyper-V virtual machines.

What this guide does not provide

This guide does not provide instructions for migrating clustered roles by methods other than using the Copy Cluster Roles Wizard.
This guide identifies clustered roles that require special handling before and after a wizard-based migration, but it does not provide detailed instructions for migrating any specific role or feature. To find out requirements and dependencies for migrating a specific Windows Server role or feature, see Migrate Roles and Features to Windows Server 2012 R2.
This guide does not provide detailed instructions for migrating a highly available virtual machine (HAVM) by using the Copy Cluster Roles Wizard. For a full discussion of migration options and requirements for migrating HAVMs to a Windows Server 2012 R2 failover cluster, and step-by-step instructions for performing a migration by using the Copy Cluster Roles Wizard, see Hyper-V: Hyper-V Cluster Migration.

Planning considerations for migrations between failover clusters

As you plan a migration to a failover cluster running Windows Server 2012 R2, consider the following:
  • For your cluster to be supported by Microsoft, the cluster configuration must pass cluster validation. All hardware used by the cluster should be Windows logo certified. If any of your hardware does not appear in the Windows Server Catalog in hardware certified for Windows Server 2012 R2, contact your hardware vendor to find out their certification timeline.
    In addition, the complete configuration (servers, network, and storage) must pass all tests in the Validate a Configuration Wizard, which is included in the Failover Cluster Manager snap-in. For more information, see Validate Hardware for a Failover Cluster.
  • Hardware requirements are especially important if you plan to continue to use the same servers or storage for the new cluster that the old cluster used. When you plan the migration, you should check with your hardware vendor to ensure that the existing storage meets certification requirements for use with Windows Server 2012 R2. For more information about hardware requirements, see Failover Clustering Hardware Requirements and Storage Options.
  • The Copy Cluster Roles Wizard assumes that the migrated role or feature will use the same storage that it used on the old cluster. If you plan to migrate to new storage, you must copy or move of data or folders (including shared folder settings) manually. The wizard also does not copy any mount point information used in the old cluster. For information about handling mount points during a migration, see Cluster Migrations Involving New Storage: Mount Points.
  • Not all clustered services and features can be migrated to a Windows Server 2012 R2 failover cluster by using the Copy Cluster Roles Wizard. To find out which clustered services and applications can be migrated by using the Copy Cluster Roles Wizard, and operating system requirements for the source failover cluster, see Migration Paths for Migrating to a Failover Cluster Running Windows Server 2012 R2.

Migration scenarios that use the Copy Cluster Roles Wizard

When you use the Copy Cluster Roles Wizard for your migration, you can choose from a variety of methods to perform the overall migration. This guide provides step-by-step instructions for the following two methods:
  • Create a separate failover cluster running Windows Server 2012 and then migrate to that cluster. In this scenario, you migrate from a multi-node cluster running Windows Server 2008 R2, Windows Server 2012, or Windows Server 2012 R2. For more information, see Migrate Between Two Multi-Node Clusters: Migration to Windows Server 2012 R2.
  • Perform an in-place migration involving only two servers. In this scenario, you start with a two-node cluster that is running Windows Server 2008 R2 SP1 or Windows Server 2012, remove a server from the cluster, and perform a clean installation (not an upgrade) of Windows Server 2012 R2 on that server. You use that server to create a new one-node failover cluster running Windows Server 2012 R2. Then you migrate the clustered services and applications from the old cluster node to the new cluster. Finally, you evict the remaining node from the old cluster, perform a clean installation of Windows Server 2012 R2 and add the Failover Clustering feature to that server, and then add the server to the new failover cluster. For more information, see In-Place Migration for a Two-Node Cluster: Migration to Windows Server 2012 R2.
Note
We recommend that you test your migration in a test lab environment before you migrate a clustered service or application in your production environment. To perform a successful migration, you need to understand the requirements and dependencies of the service or application and the supporting roles and features in Windows Server in addition to the processes that this migration guide describes.

Migrate DHCP Server to Windows Server 2012 R2

Applies To: Windows Server 2008, Windows Server 2012 R2, Windows Server 2012
DHCP server role migration involves moving the settings for your existing DHCP server to a new DHCP server on the network. The goal of this server migration is to install the DHCP server role on the Windows Server® 2012 R2 operating system so that it provides DHCP leases on a network without any perceptible change to DHCP client computers.

About this guide

This guide describes the steps for migrating existing DHCP server settings to a server that is running Windows Server 2012 R2. Migration documentation and tools ease the migration of server role settings and data from an existing server to a destination server that is running Windows Server 2012 R2. By using the tools that are described in this guide to migrate a DHCP server, you can simplify migration, reduce migration time, increase the accuracy of the migration process, and help eliminate possible conflicts that might otherwise occur during DHCP migration. For more information about the migration tools, see DHCP Server Migration: Appendix A.

Target audience

This guide is intended for information technology (IT) administrators, IT professionals, and other knowledge workers who are responsible for the operation and deployment of DHCP servers in a managed environment.

What this guide does not provide

The following scenarios are not supported or are beyond the scope of this guide.
  • Clustering scenarios are not supported by this migration process. For more information about migrating DHCP Server in a cluster environment, see Migrating DHCP to a Cluster Running Windows Server 2008 R2 Step-by-Step Guide (http://go.microsoft.com/fwlink/?LinkId=140512) on the Windows Server TechCenter.
    Also see Migrate to DHCP Failover. DHCP failover is a new option for DHCP high availability, introduced in Windows Server 2012.
  • Upgrading roles on the same computer is out of scope for this guide.
  • Scenarios in which the new operating system is installed on existing server hardware by using the Upgrade option during setup (in-place upgrades) are not covered in this guide.
  • Migrating more than one server role is not covered in this guide.

Supported migration scenarios

This guide gives you the instructions to migrate an existing DHCP server to a server that is running Windows Server 2012 R2. This guide does not contain instructions for migration when the source server is running multiple roles. If your server is running multiple roles, we recommend that you design a custom migration procedure specific to your server environment based on the information provided in other role migration guides. Migration guides for additional roles are available on the Windows Server 2012 TechCenter (http://technet.microsoft.com/library/jj134039.aspx).
Warning
If the source server is running multiple roles, some migration steps in this guide, such as those for computer name and IP configuration, can cause other roles that are running on the source server to fail.
This guide provides instructions only for migrating DHCP data and settings from a server that is being replaced by an x64-based server running Windows Server 2012 R2.

Supported operating systems

This guide provides instructions for migration of a DHCP server from a server that is running Windows Server 2003 or a later operating system to a server running Windows Server 2012 R2. Supported operating systems are listed in the following table.

Supported operating systems for migration

Source server processorSource server operating systemDestination server operating systemDestination server processor
x86- or x64-basedWindows Server 2003 with Service Pack 2Windows Server 2012 R2, both full and Server Core installation optionsx64-based
x86- or x64-basedWindows Server 2003 R2Windows Server 2012 R2, both full and Server Core installation optionsx64-based
x86- or x64-basedWindows Server 2008Windows Server 2012 R2, both full and Server Core installation optionsx64-based
x64-basedWindows Server 2008 R2Windows Server 2012 R2, both full and Server Core installation optionsx64-based
x64-basedServer Core installation option of Windows Server 2008 R2Windows Server 2012 R2, both full and Server Core installation optionsx64-based
x64-basedWindows Server 2012Windows Server 2012 R2, both full and Server Core installation optionsx64-based
x64-basedServer Core installation option of Windows Server 2012Windows Server 2012 R2, both full and Server Core installation optionsx64-based
x64-basedWindows Server 2012 R2Windows Server 2012 R2, both full and Server Core installation optionsx64-based
x64-basedServer Core installation option of Windows Server 2012 R2Windows Server 2012 R2, both full and Server Core installation optionsx64-based
The versions of operating systems shown in the previous table are the oldest combinations of operating systems and service packs that are supported. Newer service packs, if available, are supported for the migration of DHCP server settings.
Foundation, Standard, Enterprise, and Datacenter editions of Windows Server are supported as either source or destination servers.
Migrations between physical operating systems and virtual operating systems are supported.
Migration from a source server to a destination server that is running an operating system in a different system user interface (UI) language than the source server is not supported. The system UI language is the language of the localized installation package that was used to set up the Windows operating system. For example, you cannot use Windows Server migration tools to migrate roles, operating system settings, data, or shares from a computer that is running Windows Server 2008 R2 in the French system UI language to a computer that is running Windows Server 2012 R2 in the German system UI language.
Both x86-based and x64-based migrations are supported for Windows Server 2003 and Windows Server 2008. All editions of Windows Server 2012 R2 are x64-based.
Roles that are running on Server Core installations of Windows Server 2008 cannot be migrated, because there is no .NET Framework available on Server Core installations of Windows Server 2008.
We recommend migration rather than an upgrade even when the hardware is native x64-based. For example, with a server role split, a scenario in which the source server has more than one server role, because of increased use of this server you might decide to separate the roles onto several additional x64-based servers. In this case, migrating (not upgrading) individual server roles to other servers may be the best solution.
The server administrator can choose which components of an existing installation to migrate; together with the server role, these components usually include configuration, data, system identity, and operating system settings.

Supported role configurations

You can migrate all DHCP Server settings by using this guide, including registry and database settings.
Note
If you are migrating a DHCP server in a cluster configuration, see Migrating DHCP to a Cluster Running Windows Server 2008 R2 Step-by-Step Guide (http://go.microsoft.com/fwlink/?LinkId=140512) on the Windows Server TechCenter. Also see Migrate to DHCP Failover. DHCP failover is a new option for DHCP high availability, introduced in Windows Server 2012.

DHCP Server migration overview

DHCP Server migration is divided into the following major sections:

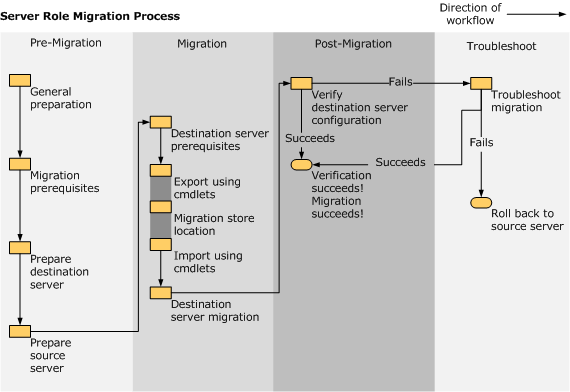
DHCP Server migration process

As shown in the following illustration, the pre-migration process involves the manual collection of data, followed by procedures on the destination and source servers. The migration process includes source and destination server procedures that use the Export and Import cmdlets to automatically collect, store, and then migrate server role settings. Post-migration procedures include verifying that the destination server successfully replaced the source server and then retiring or repurposing the source server. If the verification procedure indicates that the migration failed, troubleshooting begins. If troubleshooting fails, rollback instructions are provided to return to the use of the original source server.

Impact of migration on other computers in the enterprise

During migration, the source DHCP server might not be available. Therefore, client computers will not be able to obtain IP addresses from this DHCP server. We recommend that you maintain or create an auxiliary DHCP server so that client computers can obtain IP addresses while you migrate the primary DHCP server.
Be aware that if you choose to perform the migration without any auxiliary DHCP servers, all clients with valid leases must keep using those leases. If a lease for an existing client expires, that client will not be able to obtain an IP address. In addition, any new client that connects to the network will not be able to obtain an IP address when the single-source DHCP server is not available.

Permissions required to complete migration

The following permissions are required on the source server and the destination server:
  • Domain administrative rights that are required to authorize DHCP Server.
  • Local administrative rights are required to install or manage DHCP Server.
  • Write permissions are required to the migration store location. For more information, see DHCP Server Migration: Preparing to Migrate.

Estimated duration

The migration can take two to three hours, including testing.

Friday, February 2, 2018

Step-By-Step: Removing A Domain Controller Server Manually

if the Dcpromo command failed use the command

> dcpromo /forceremoval

or

You have to remove  a Domain Controller server manually

Step 1: Cleaning up metadata via Active Directory Users and Computers


  1. Log in to DC server as Domain/Enterprise administrator and navigate to Server Manager > Tools > Active Directory Users and Computers
     
  2. Expand the Domain > Domain Controllers

  3. Right click on the DC server that need to remove manually and click delete


  4. In next dialog box, click yes to confirm


  5. In next dialog box, select This Domain Controller is permanently offline and can no longer be demoted using the Active Directory Domain Services Installation Wizard (DCPROMO) and click Delete


  6. If the domain controller is global catalog server, in next window click yes to continue with deletion
     
  7. If the domain controller holds any FSMO roles in next window, click ok to move them to the domain controller which is available

Step 2: Cleaning up the DC server instance from the Active Directory Sites and Services


  1. Go to Server manager > Tools > Active Directory Sites and Services
     
  2. Expand the Sites and go to the server which need to remove
     
  3. Right click and click Delete


  4. In next window click yes to confirm
     

Step 3: Clean up metadata using ntdsutil

NOTE: Windows Server 2003 or earlier used ntdsutil and was bit of challenge but this was later simplified


  1. Right Click on Start > Command Prompt (admin)
     
  2. Type ntdsutil and enter


  3. Then metadata cleanup


  4. Next type remove selected server , replace with DC server to remove


  5. In warning window click yes to proceed
     
  6. Execute quit command twice

Metadata Cleanup of a Domain controller

Delete orphan DCs from Active Directory

The following commands should be run to cleanup orphan domains and domain controllers.

At the command prompt, type ntdsutil
ntdsutil: metadata cleanup
Metadata cleanup: connections
Server connections: connect to server yourserver.yourdomain.com (i.e. the root forest domain controller) Binding to yourserver.yourdomain.com ……. Connected to yourserver.yourdomain.com using credentials of locally logged on user server connections: quit (You are now connected to the domain controller)
Metadata cleanup: select operation target
Select operation target: list domains
(Lists all domains in the forest) Found 7 domains(s)
0 – DC=yourserver, DC=yourdomain, DC=com
1 – DC=……….. (Listing of all domains in the forest)
Select operation target: select domain x
(Where x is the number of the domain to be deleted and/ or where the domain controller to be deleted is located) No current site
Domain – DC=….. No current server
No Current Naming Context
Select operation target: list sites
Found 1 site(s)
0 – CN=yoursite, CN=Sites, CN=Configuration, DC=yourserver, DC=yourdomain, DC=com
Select operation target: select site x
(Where x is the number of the site where the domain and/or the domain controller to be deleted is located)
Site – CN=yoursite, CN=Sites, CN=Configuration, DC=yourserver, DC=yourdomain, DC=com
Domain – DC=……..
No current server No current Naming Context
Select operation target: list servers in site
Found 6 server(s) 0 – CN=……… 1 – CN=………. (Listing of all servers found in the site selected)
Select operation target: select server x
(Where x is the number of the server to be deleted from the list displayed in the previous operation)
Site – CN=yoursite, CN=Sites, CN=Configuration, DC=yourserver, DC=yourdomain, DC=com
Domain – DC=……
Server – CN=…….
DSA object – CN=NTDS Settings, CN=…….. (Display of the domain, server and settings for the domain controller to be deleted)
No current Naming Context
select operation target: quit
Metadata cleanup: remove selected server
“CN=……..” server being removed (A popup window is also displayed verifying you really want to delete this domain controller) removed from server “yourserver.yourdomain.com” (verifies the removal of the domain controller) metadata cleanup: remove selected domain
“DC=…….” removed from server “yourserver.yourdomain.com” (verifies the removal of the domain)
Note: At this point, Active Directory confirms that the domain controller was removed successfully. If you receive an error that the object could not be found, Active Directory might have already removed from the domain controller.
Metadata cleanup: quit
Ntdsutil: quit
Disconnecting from …………
To remove the failed server object from the sites
1. In Active Directory Sites and Services, expand the appropriate site.
2. Delete the server object associated with the failed domain controller.
To remove the failed server object from the domain controllers container
1. In Active Directory Users and Computers, expand the domain controllers container.
2. Delete the computer object associated with the failed domain controller.
To remove the failed server object from DNS
1. In the DNS snap-in, expand the zone that is related to the domain from where the server has been removed.
2. Remove the CNAME record in the _msdcs.root domain of forest zone in DNS. You should also delete the HOSTNAME and other DNS records.
3. If you have reverse lookup zones, also remove the PTR record of the server from these zones.